WooCommerce Product Reviews: Everything you need to know
Understand WooCommerce product reviews from setup to display. Fix common problems and learn how to gather stronger reviews for better trust and conversions.
Customers check product reviews before they buy, so you need a clear review system that works without issues.
WooCommerce already gives you a built-in way to collect and display reviews, but many store owners do not know how to set it up, manage it, or get more reviews.
This guide gives you a direct view of how WooCommerce product reviews work.
You will learn how to enable them, how to manage them, how to improve their quality, and how to fix problems when reviews don’t show.
This helps you build trust, get more sales, and keep your store running smoothly.
Why product reviews matter in WooCommerce
Product reviews help customers understand if your product is right for them. They show real use cases, real results, and real feedback.
This reduces doubt and gives shoppers the confidence they need to complete a purchase.
When your store displays clear and honest reviews, it builds trust and improves the overall buying experience.
Here’s why reviews matter:
They help customers trust your product through real buyer experiences.
They answer common questions customers have before buying.
They increase conversions by reducing hesitation. 95% of shoppers read reviews before they buy.
They improve page visibility by adding fresh user-generated content.
They show your store as dependable and transparent.
Reviews give your WooCommerce store a stronger reputation and guide customers toward faster, clearer buying decisions.
All your reviews in one place
Collect reviews, manage every response, and display them where they matter most.
The WooCommerce review system is built into the product page, and it uses the same engine that powers WordPress comments.
This setup makes reviews easy to manage and keeps everything in one place.
Customers can share their experience through ratings and comments, and you control what gets published.
How the system functions
WooCommerce collects each review as a comment with an added star rating. The review shows under the product, and the rating contributes to the overall score.
What you can control
You can decide who can review your products and how reviews get approved. This helps reduce spam and keeps feedback real.
Key actions you can manage
Allow or block reviews from unverified customers.
Approve reviews manually before showing them.
Show star ratings on product listings and product pages.
Here are the best ways to set up reviews in WooCommerce.
How to Add Product Reviews in WooCommerce
WooCommerce’s built-in review system is basic. It works for simple star ratings and text comments, but it doesn’t offer photo reviews, widgets, automation, or advanced layouts.
WiserReview fills these gaps and gives you more control at a low cost.
Here’s how to set it up step by step.
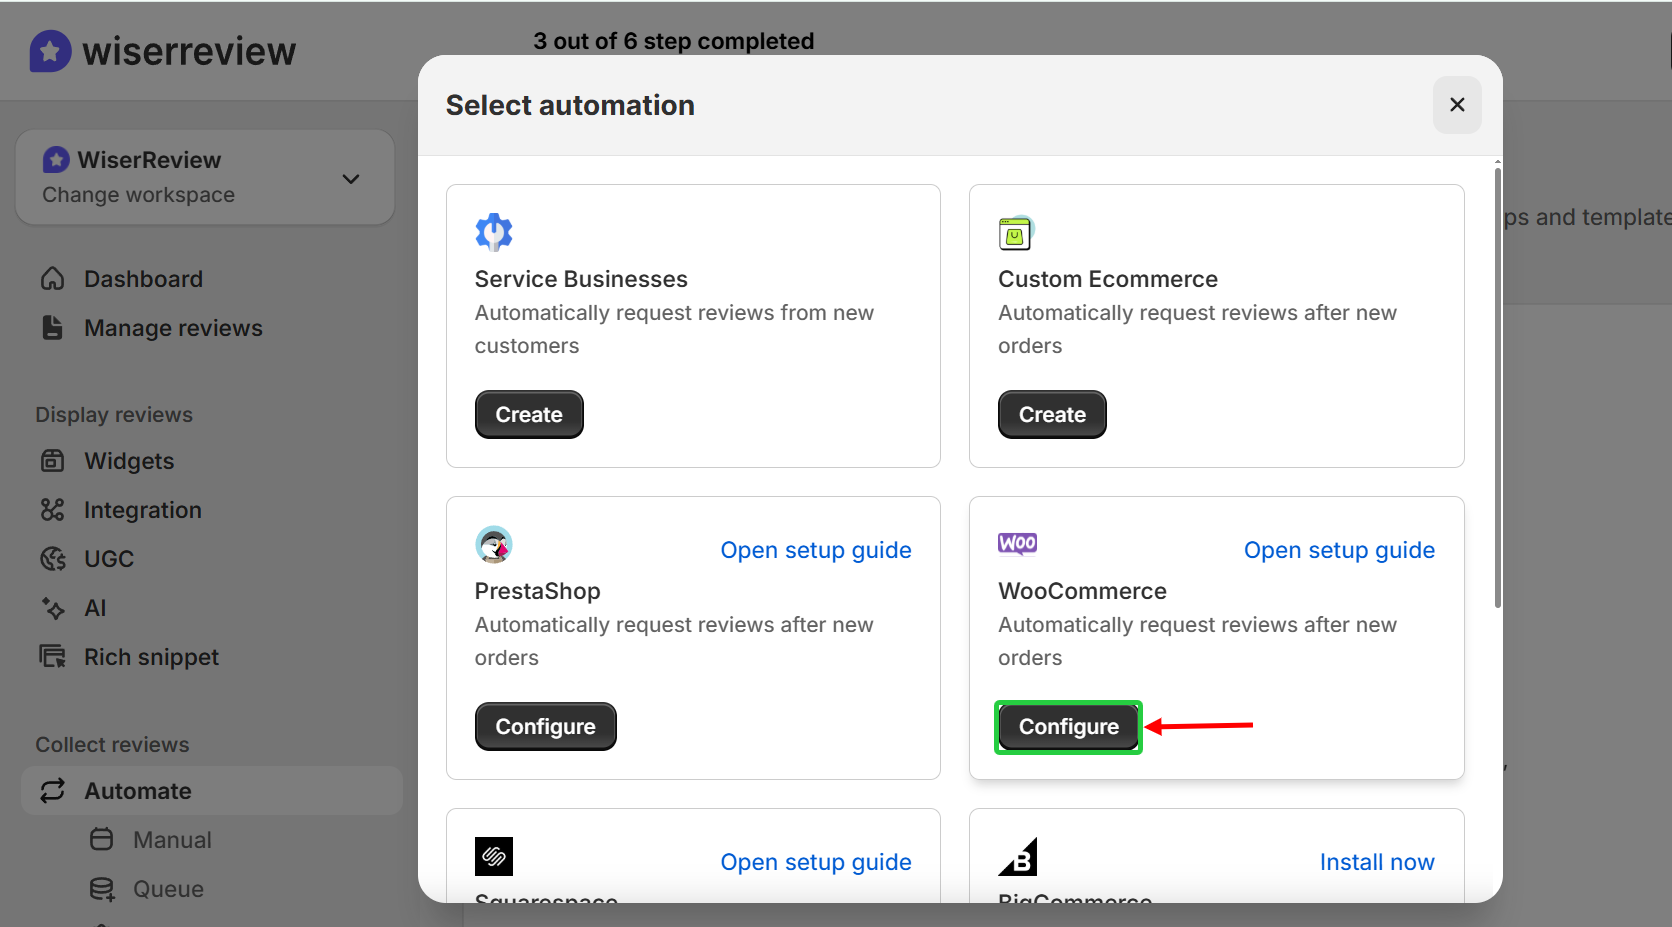
Step 1: Install and connect WiserReview
Start by installing the plugin from your WordPress dashboard.
Go to Plugins → Add New
Search WiserReview
Install and activate
After activation, connect your WooCommerce store so WiserReview can sync your products and existing reviews automatically.
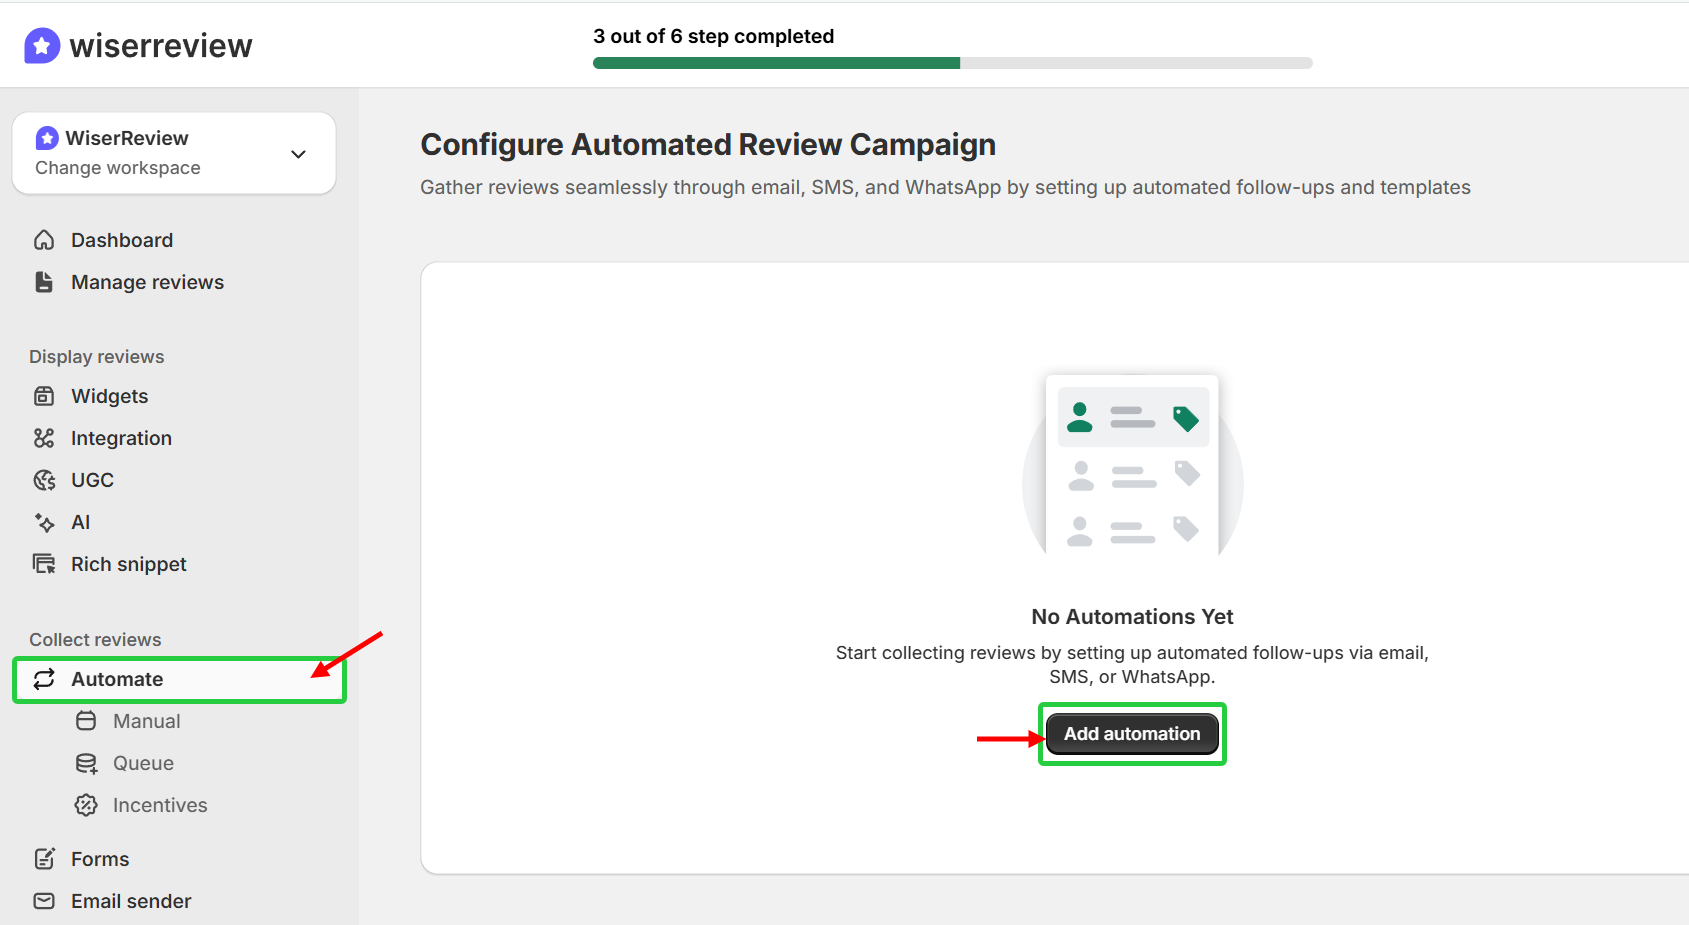
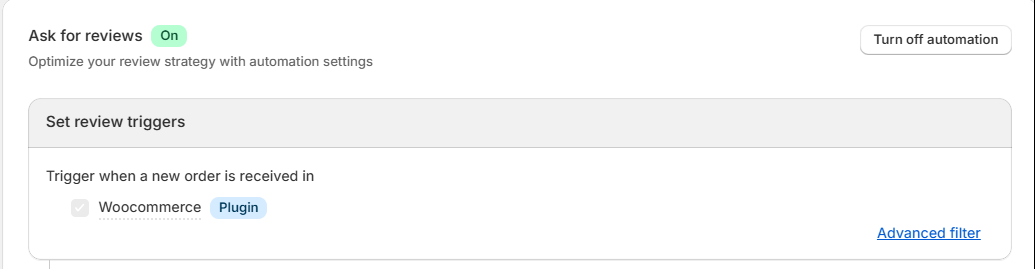
Step 2: Set up your review request automation
WooCommerce cannot send review requests on its own.
With WiserReview, you can:
Send review requests after each order
Use email, SMS, or WhatsApp (depending on your settings)
Target verified buyers only.
This helps youcollect reviews consistently without manual effort.
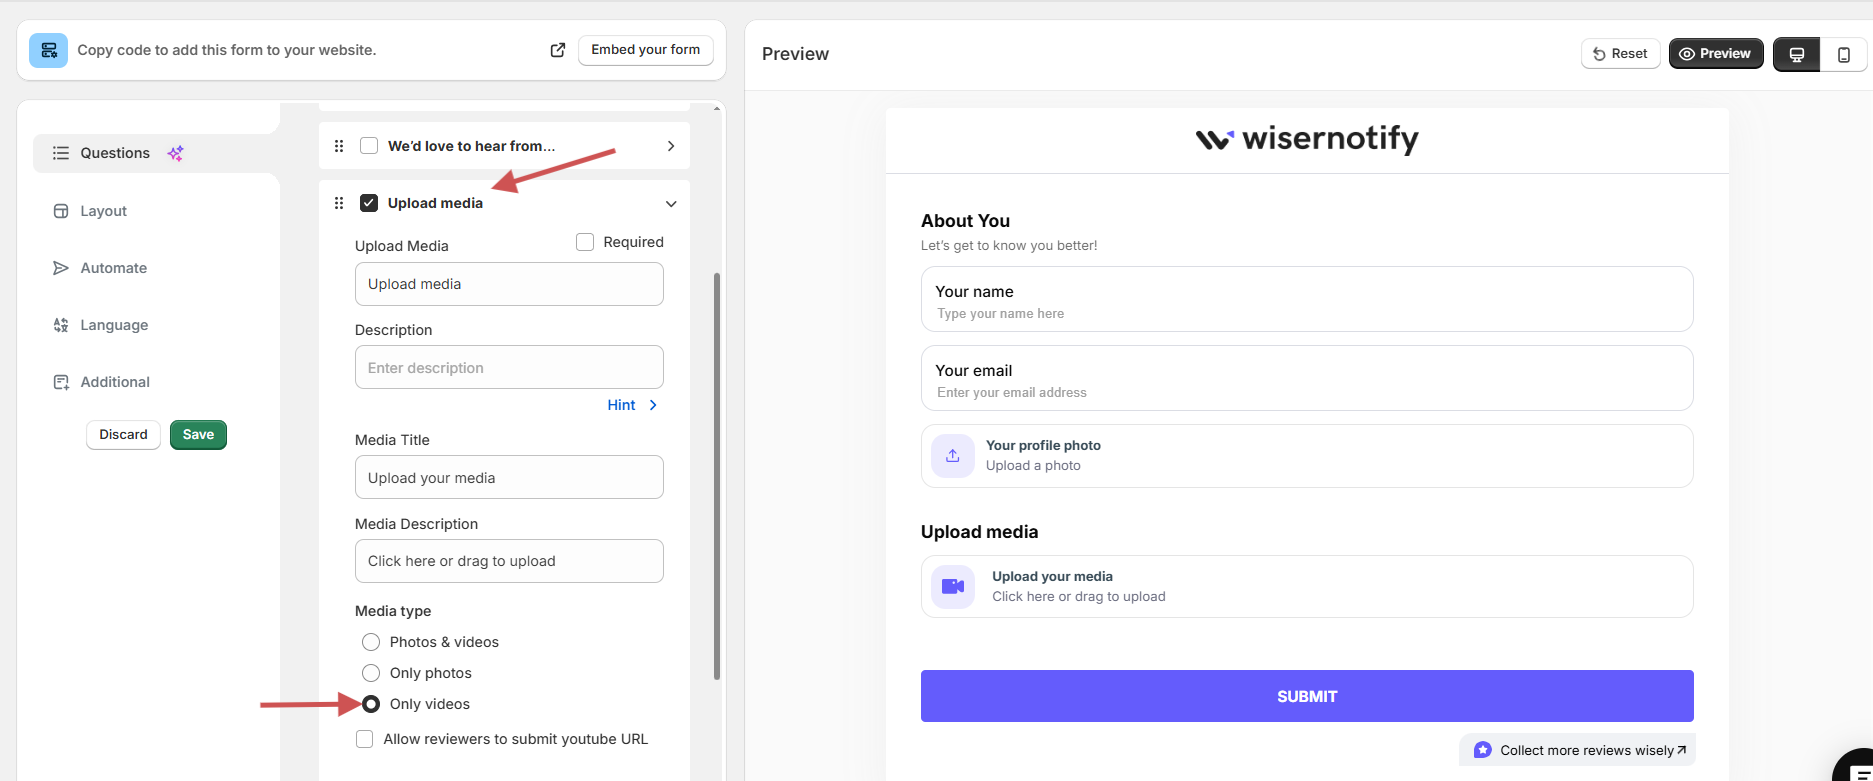
Step 3: Enable photo and video reviews
WooCommerce supports only text reviews.
WiserReview lets customers upload:
Photos
Videos
Star ratings with media
This gives you stronger social proof and more engaging review content.
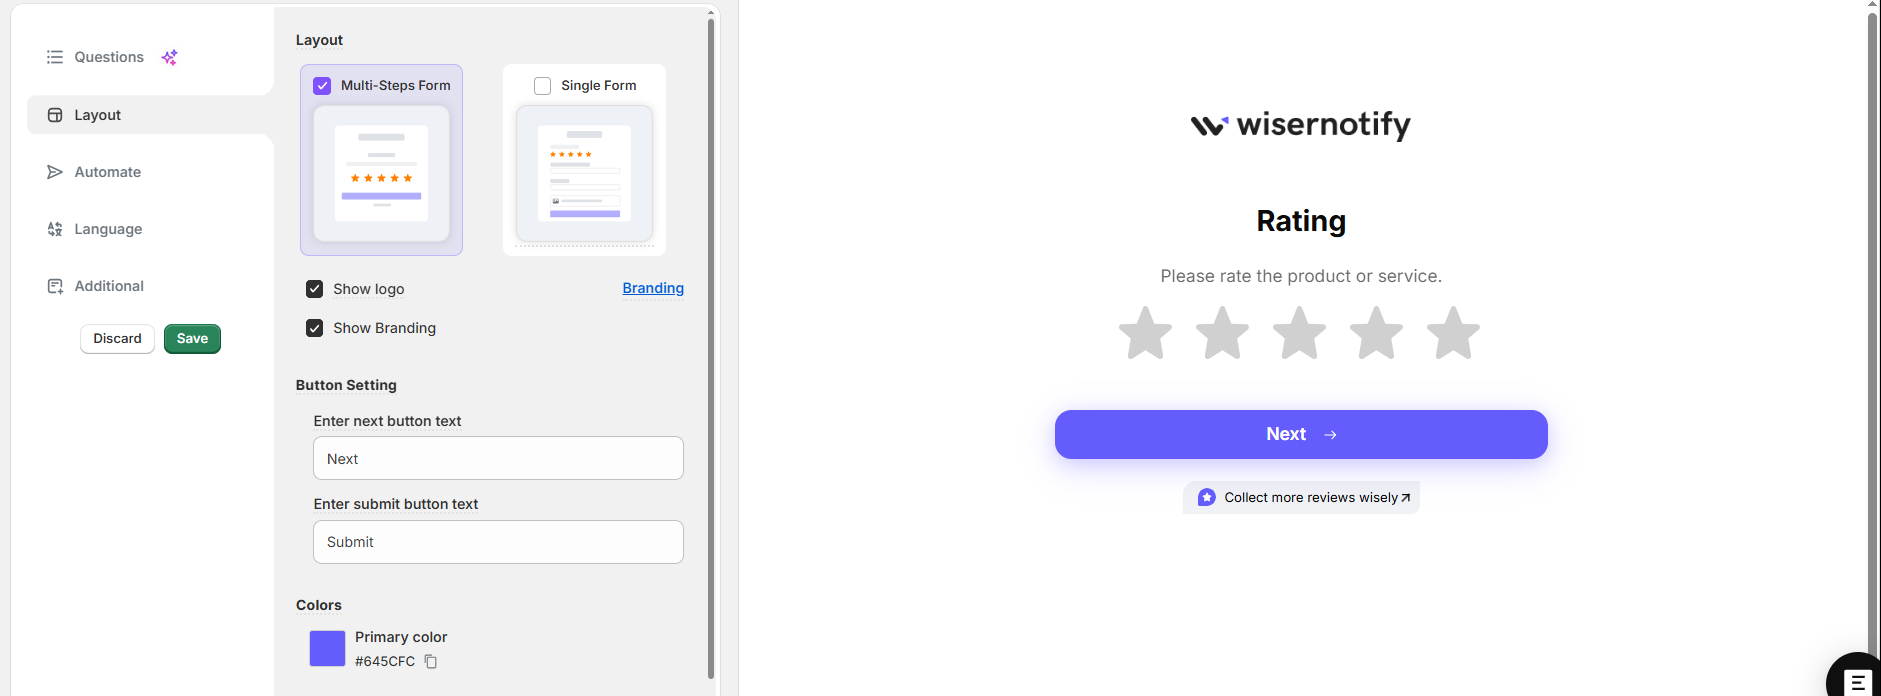
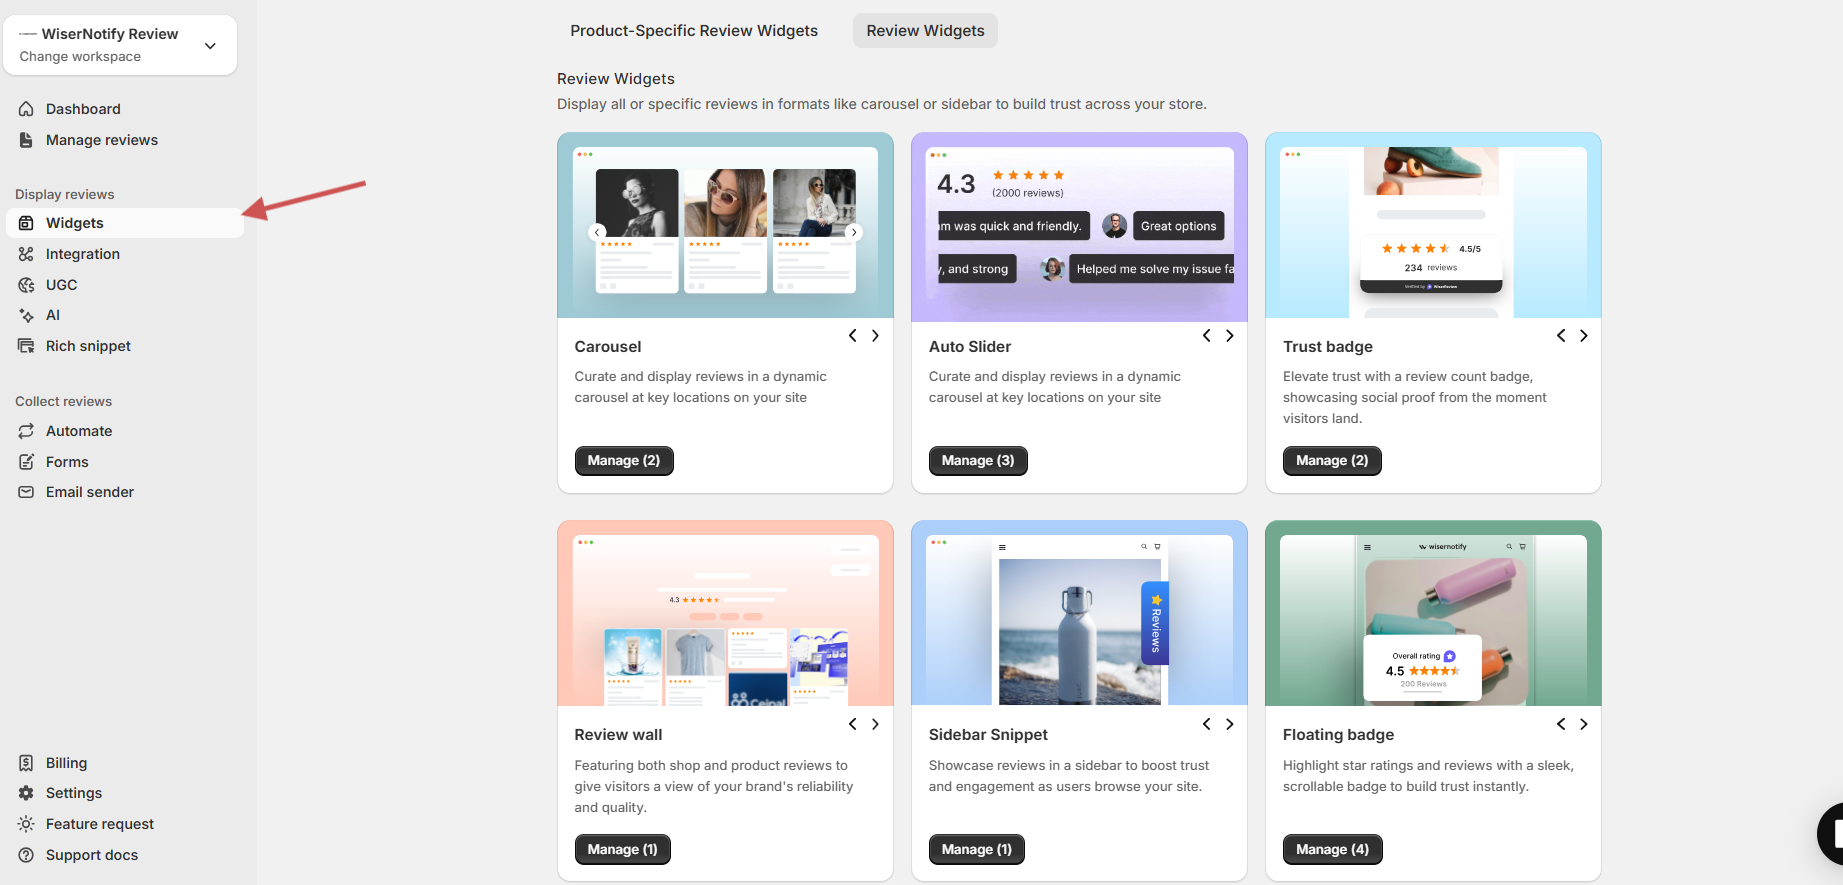
Step 4: Choose a display widget
Unlike WooCommerce’s single review tab, WiserReview allows multiple display styles.
The simplest way to show reviews anywhere on your store is by using a plugin.
WiserReview makes it easy to display WooCommerce reviews through shortcodes without writing any code.
1. Installing and activating the plugin
Start by installing WiserReview from your WordPress dashboard.
Go to Plugins → Add New.
Search for WiserReview.
Click Install and then Activate.
Once it’s active, connect it to your WooCommerce store. The plugin will automatically sync all your existing reviews.
2. Finding and enabling the review shortcode option
After setup, open the WiserReview dashboard inside WordPress.
Go to the Widgets or Display section
Enable the shortcode option for the review layouts you want to use This gives you access to shortcode blocks for reviews, sliders, or badges.
3. Standard plugin shortcodes and attributes
Each widget comes with its own shortcode and settings.
Example: [wiserrw_product_review]
You can adjust attributes like layout type, number of reviews, or product ID These shortcodes let you control how reviews appear without editing templates.
4. Placing the shortcode in your page, post, or theme
You can place shortcodes anywhere you want reviews to appear.
Paste them into a WordPress block on any page or post
Add them to aWooCommerce review widget area or inside your theme template When you save the changes, reviews will appear instantly in that location.
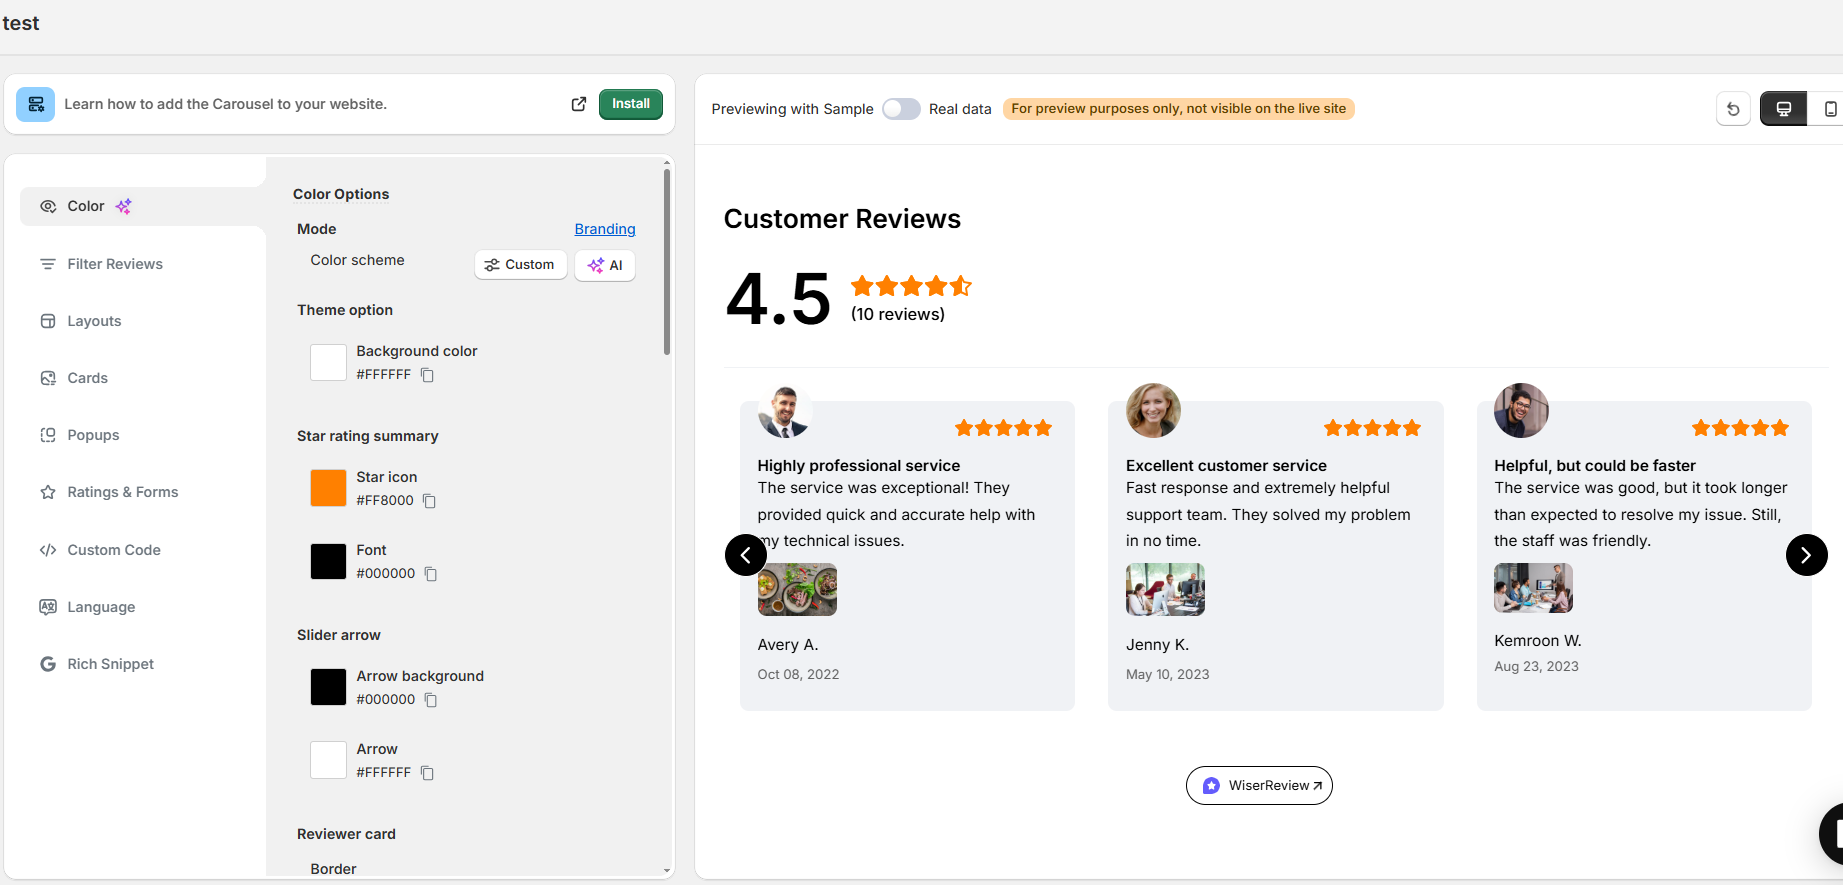
5. Customizing appearance and behavior
WiserReview lets you style your reviews to match your store design.
Choose layouts like grids, sliders, or walls
Adjust colors, fonts, and spacing
Control how many reviews appear per section
These options help you keep your store’s look consistent while showing social proof effectively.
This method removes reviews from your entire store in three quick steps. Using built-in WooCommerce settings is the easiest and fastest way to disable reviews.
Step 1: Open the WooCommerce settings
Log in to your WordPress dashboard. Navigate to WooCommerce → Settings → Products in the left sidebar.
This takes you to the main products configuration page, where you control store-wide review settings.
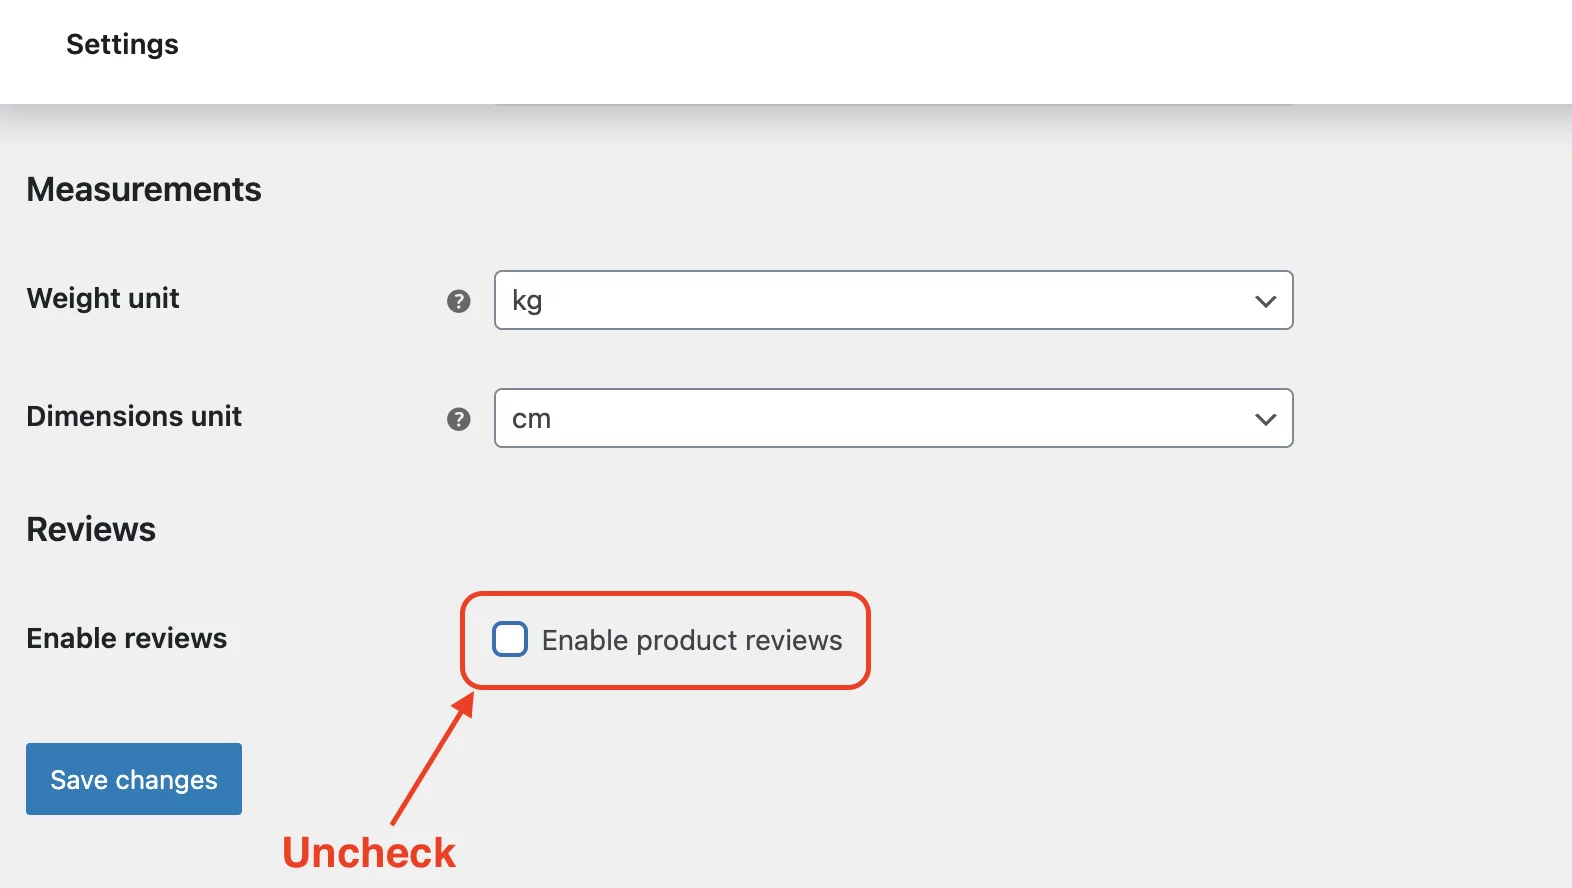
Step 2: Turn off reviews globally
Now scroll down to the bottom of the Products tab. You will find a checkbox labeled “Enable product reviews.” To disable product reviews on all products, unselect the checkbox.
Finally, select Save changes at the bottom. This will simultaneously remove the reviews tab from the products and any reviews listed on the product pages. The reviews will still be in the database, but will not show for sale on the UI of your
Step 3: Verify changes
Visit any product page on your store’s front end. The Reviews tab should no longer appear. Check your shop page, star ratings should be gone too.
If reviews still appear, clear your site cache. Use your caching plugin’s clear cache button.
Here are the three best WooCommerce review plugins that give you stronger features, better control, and a clearer way to collect and display customer feedback.
WiserReview
WiserReview gives you a complete suite to collect, manage, and display customer reviews on your WooCommerce store.
It supports photo and video reviews, automated emails, and custom widgets to help you leverage social proof effectively.
Main Features:
Automated review request emails after purchase
Photo and video review uploads
Review display widgets on product and landing pages
Review import and export tools
Review moderation and filtering options
Pricing:
Free plan available. Paid plans start at around $9/ month.
All your reviews in one place
Collect reviews, manage every response, and display them where they matter most.
Here are the advanced ways to display and integrate reviews across your WooCommerce store.
How to Add Google Reviews to WooCommerce
Ok, now that you know the benefits of adding Google reviews, let’s go through the steps to add them to any website or online store.
First, sign up for WiserReview. It has a free plan, and paid plans start at just $9/month.
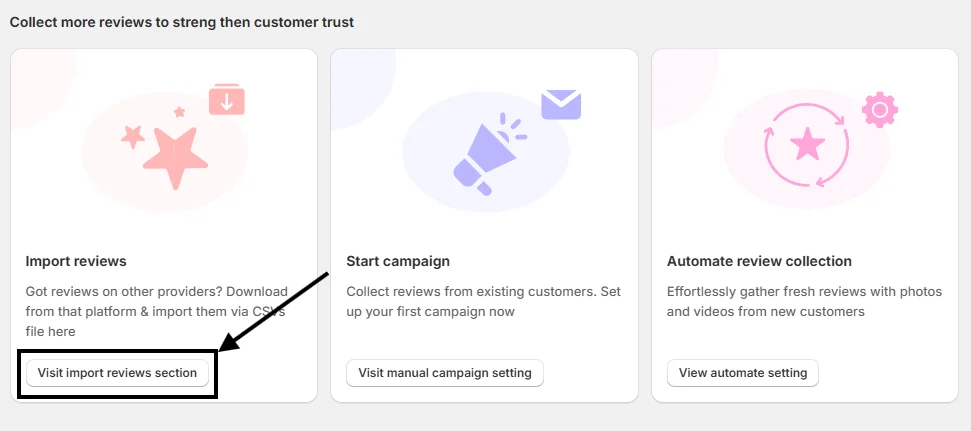
Once your account is created, you’ll land on the WiserReview dashboard. Scroll down a bit, and you’ll see this option:
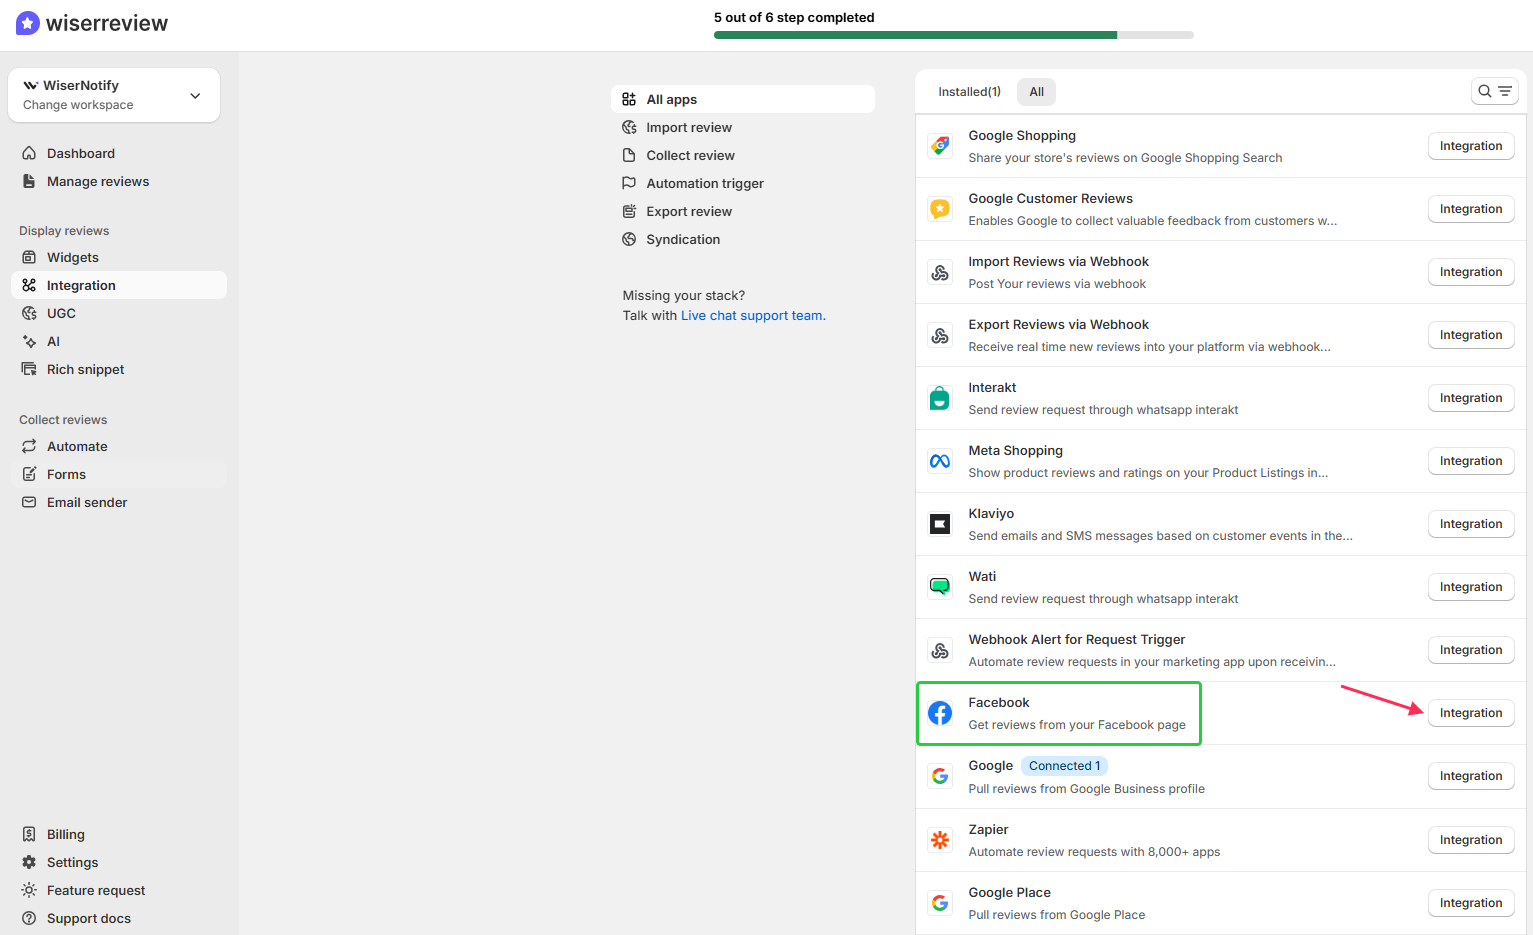
Click on “Visit Import Reviews Section.”
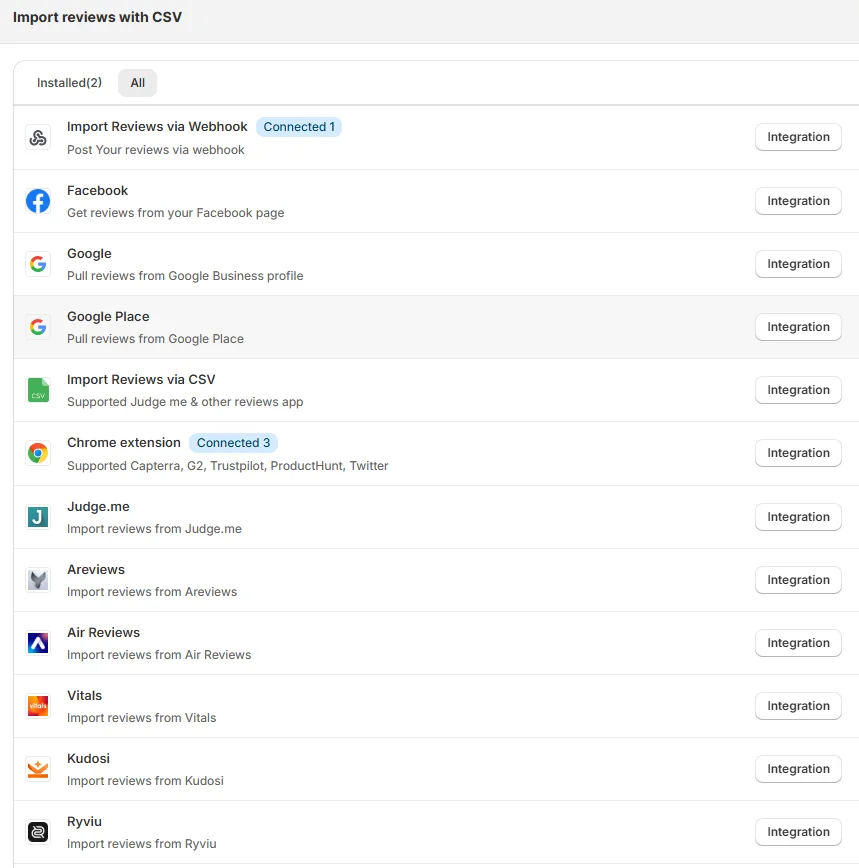
From there, you’ll find many options to pull in reviews. Choose the integration method that works best for you.
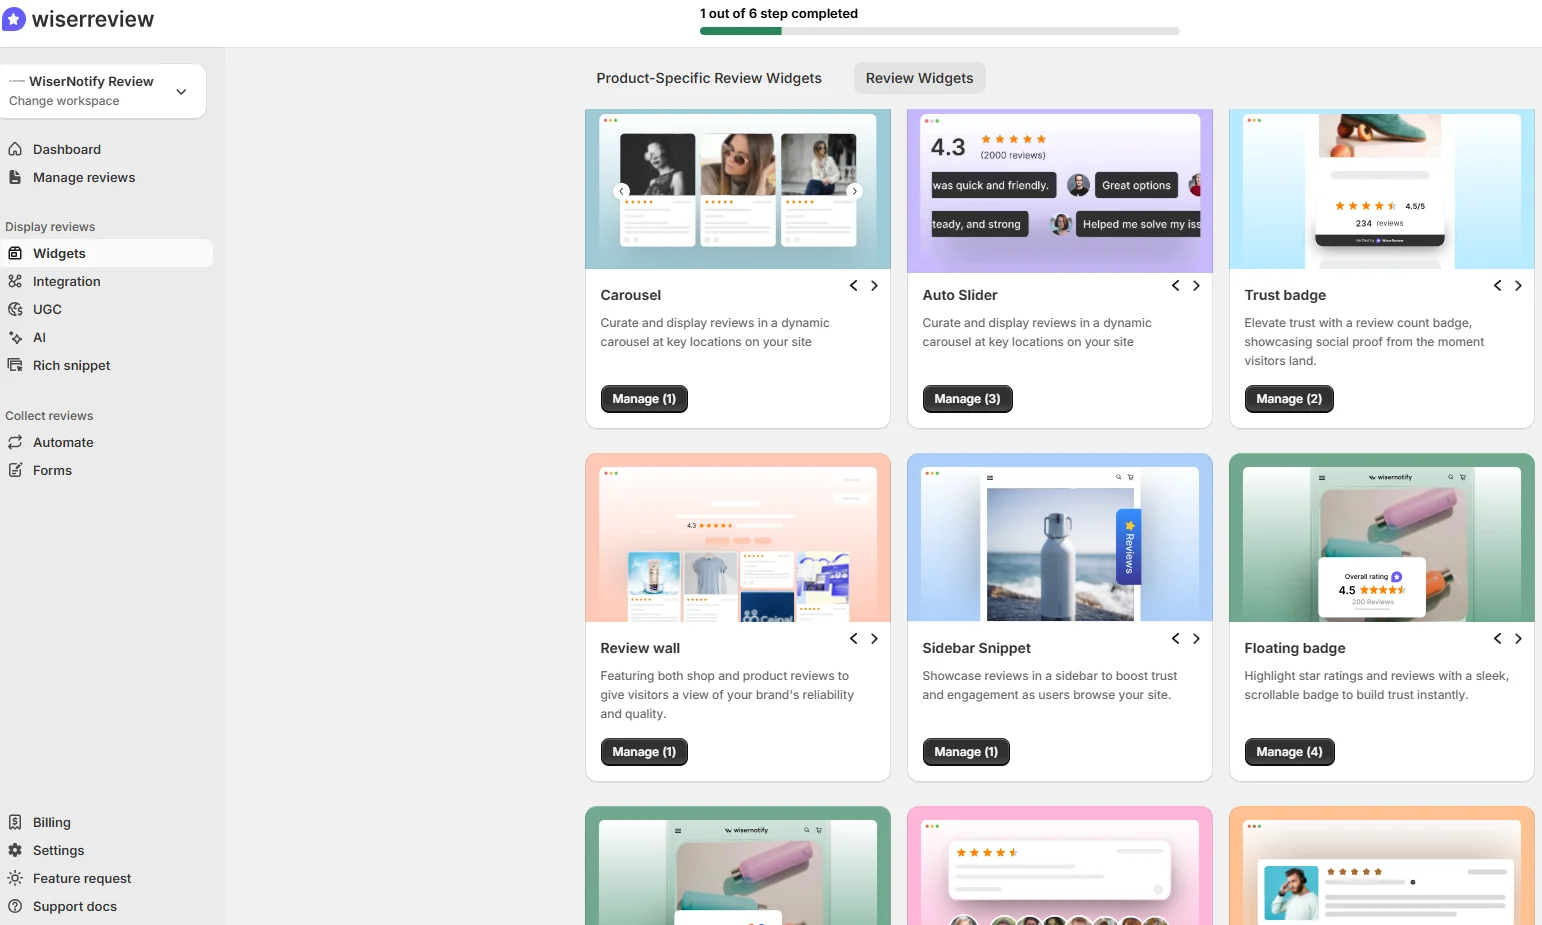
After connecting successfully, go to the Widgets section and select any widget you like.
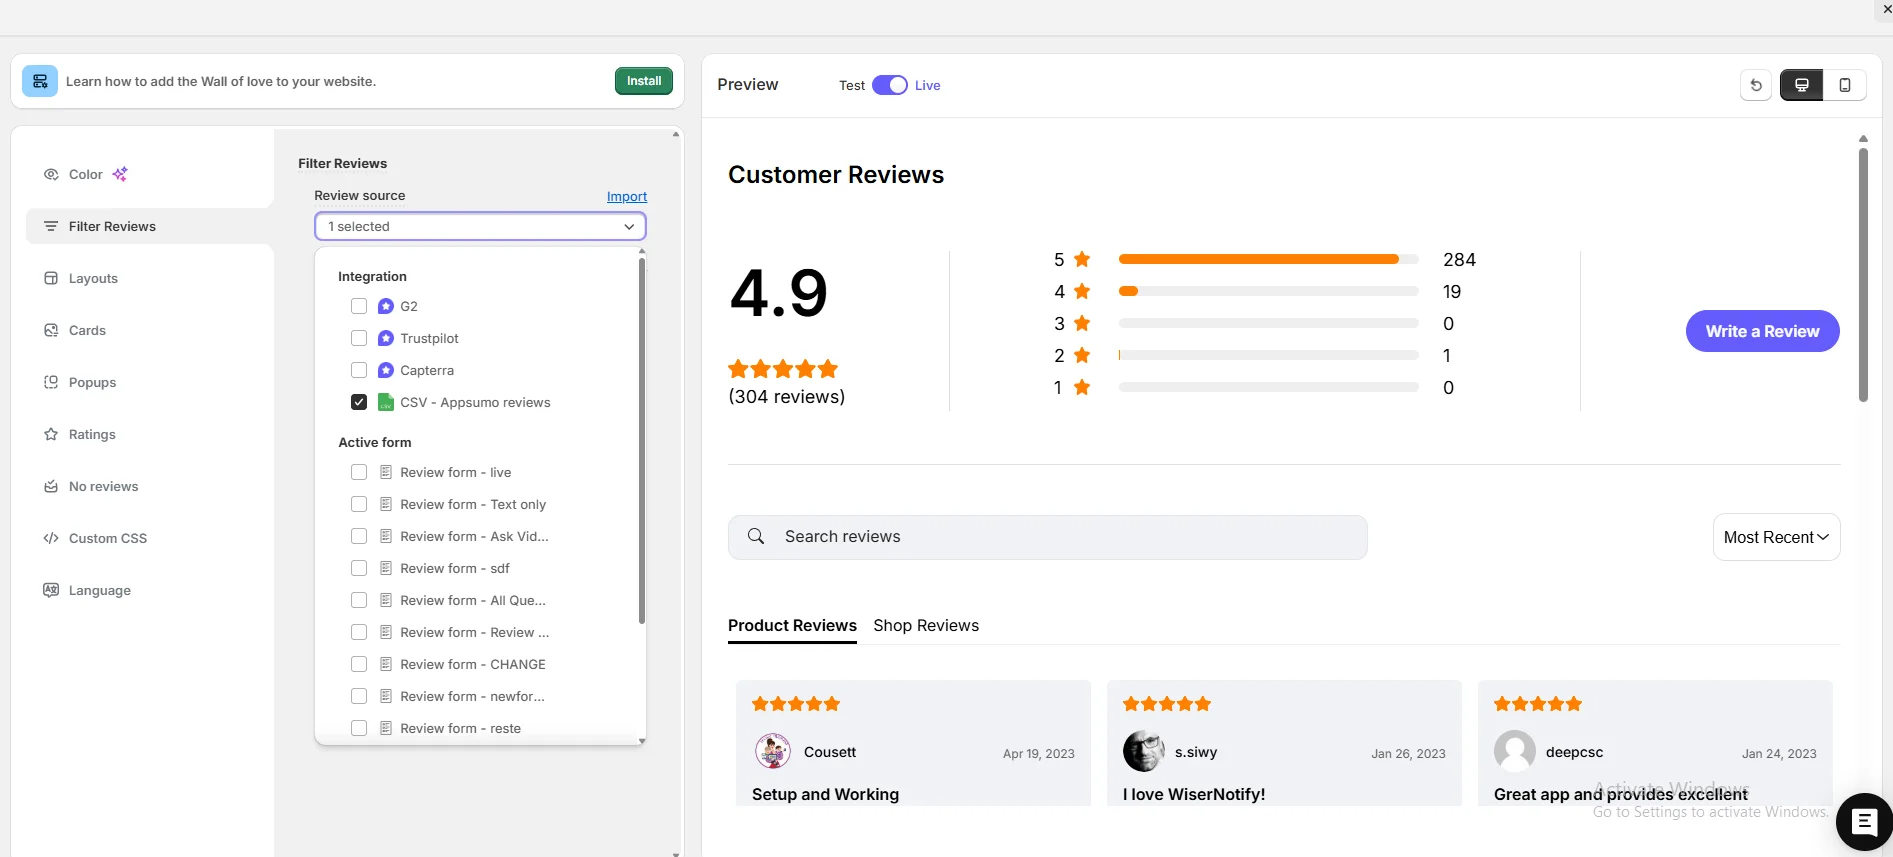
Next, go to Filter Review Options, pick your review source, and start customizing your widget.
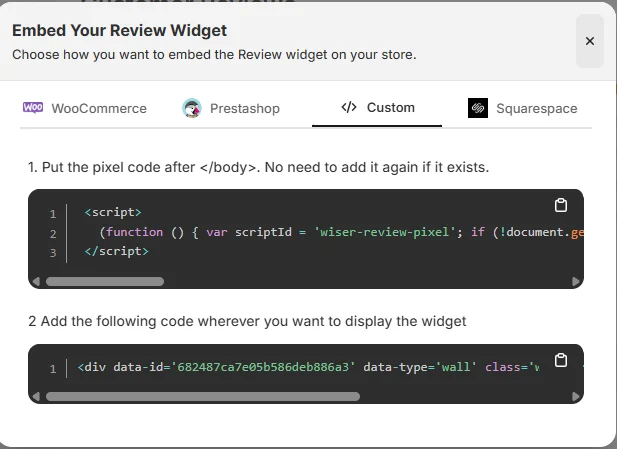
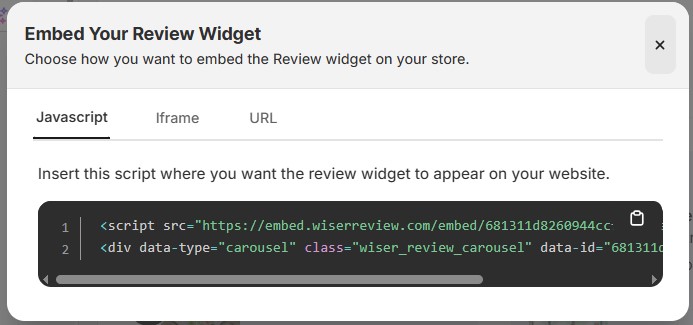
When you’re done customizing, click on Install in the upper-left corner. Copy the code and paste it where you want the Google review widget to appear on your site.
That’s it, your widget is now live and helping build trust and credibility for your site.
And here’s the best part: WiserReview offers multiple Google review widget styles you can choose from.
Plus, WiserReview doesn’t just display Google reviews; it also helps you collect and manage them. It’s a complete Google review management tool.
Here’s a video guide for reference:
After generating your WiserReview widget code, embedding it in WooCommerce is simple:
Log in to your WordPress dashboard.
Go to the page, product, or footer where you want reviews displayed.
In the block editor, add a Custom HTML block.
Paste the WiserReview embed code.
Save and update the page.
Your Google reviews will now display on your WooCommerce store and update automatically.
WiserReview makes it easy to show real customer feedback on your WooCommerce product pages. The widget displays star ratings, text reviews, photos, and videos in a clean layout that builds trust fast. Here’s the simple setup.
Step 1: Install and connect WiserReview
Install the WiserReview plugin on your WooCommerce store.
Create or log in to your account and connect the store using the API or key in the plugin settings.
Step 2: Set up the product review widget
Open the WiserReview dashboard and choose the Product Review widget.
Pick a layout, enable star ratings, and turn on photo or video reviews if you want rich content.
Step 3: Add the widget to your product pages
Enable the widget for single product pages inside the plugin settings.
Save your changes and check one product page to confirm the widget appears correctly.
Here are the quick fixes and troubleshooting steps to solve common WooCommerce review issues.
Why My WooCommerce Reviews Aren’t Showing (With Fixes)
If your WooCommerce reviews aren’t showing, you can usually fix the problem by checking a few simple settings.
Follow these steps in order to find the cause and get your reviews back on your product pages.
Step 1 – Check the global review settings
WooCommerce has a master switch that controls whether product reviews are enabled across your store.
Go to WooCommerce → Settings → Products.
Under Product Ratings, make sure Enable product reviews is turned on.
You can also enable Star ratings and Verified owner labels for better clarity. If this setting is disabled, no reviews will appear on any product page, even if customers have already submitted them.
Each product in WooCommerce has its own review setting.
Edit a product in your dashboard.
Open the Product Data → Advanced tab.
Check the box that says Enable reviews. If reviews are turned off here, they won’t show for that specific product even if global reviews are on.
Step 3 – Switch theme to test compatibility
Some themes don’t fully support WooCommerce’s built-in review section.
Temporarily switch to the Storefront theme (or another default WooCommerce theme).
Open a product page and see if reviews appear. If they do, your current theme might be hiding the reviews tab. In that case, contact the theme developer or use a plugin like WiserReview, which works independently of your theme.
Step 4 – Check for plugin conflicts
Plugins that handle comments, caching, or SEO can interfere with the display of reviews.
Deactivate all plugins except WooCommerce.
Check if reviews reappear.
Then, reactivate each plugin one by one to find which one causes the issue. Once you find the conflicting plugin, look for updates or contact the developer for a fix.
Step 5 – Clear cache and refresh permalinks
Caching plugins or CDN systems often store old versions of product pages, which can hide new reviews.
Clear your site cache (via WP Rocket, LiteSpeed, or your hosting panel).
Clear your browser cache or use an incognito window to test.
Go to Settings → Permalinks and click Save Changes to refresh URLs. This step ensures WooCommerce reloads updated data and fixes minor display glitches.
Step 6 – Advanced troubleshooting (if still not working)
If your reviews still don’t appear after all these checks:
Re-import reviews if you recently migrated from another tool.
Confirm that product IDs or SKUs match between products and reviews.
Disable custom functions or code snippets in your theme’s functions.php that may remove the comments_template() hook.
If you still face issues, consider using WiserReview. It syncs and displays reviews automatically, bypassing these themes and plugin limitations.
How to Detect and Remove Fake Reviews on WooCommerce
Once you’ve identified fake reviews, remove them immediately. WooCommerce provides several methods depending on your access level.
Step 1: Access your wordPress admin dashboard
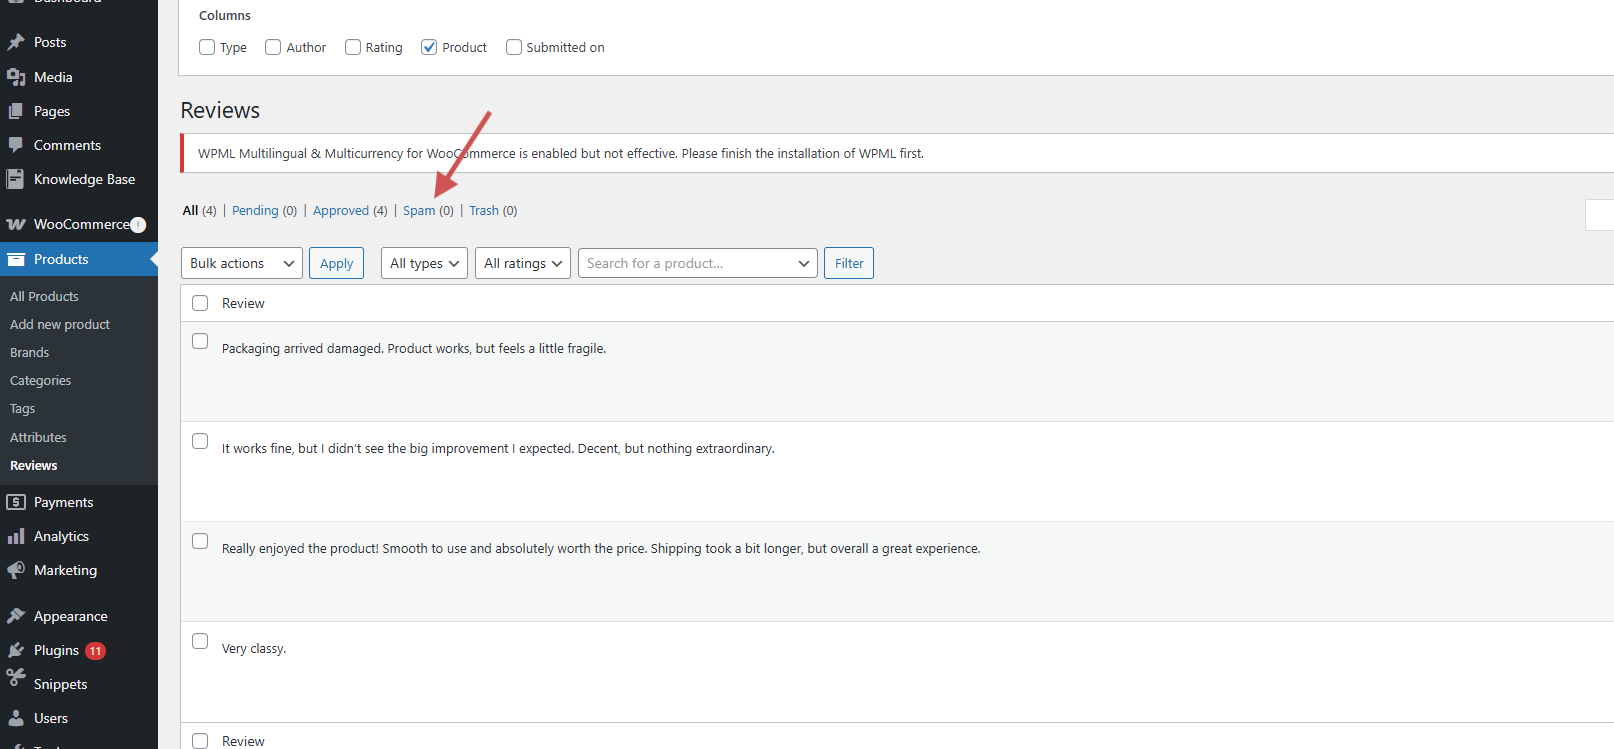
Log in to your WordPress admin panel and navigate to Reviews: Go to Products → Reviews in your WordPress admin menu.
Step 2: Navigate to the reviews section
Go to Comments in the left sidebar. WooCommerce reviews appear mixed with blog comments in this section. Filter by “Product” to show only product reviews.
Step 3: Identify fake reviews
Use the search box to find suspicious reviewer names or keywords. Check for reviews that match the patterns described in the previous section. Click on the review to see full details, including IP address and email.
Step 4: Delete or spam individual reviews
Hover over the suspicious review. Click “Trash” to permanently remove it, or click “Spam” to mark it (this helps train spam filters). Click Unapprove if you want to keep it, but hide it from public view.
Additionally, Permanently Delete reviews from Trash by clicking the Trash link at the top of the Comments page, which displays all deleted reviews. Click Empty Trash to permanently remove them from your database.
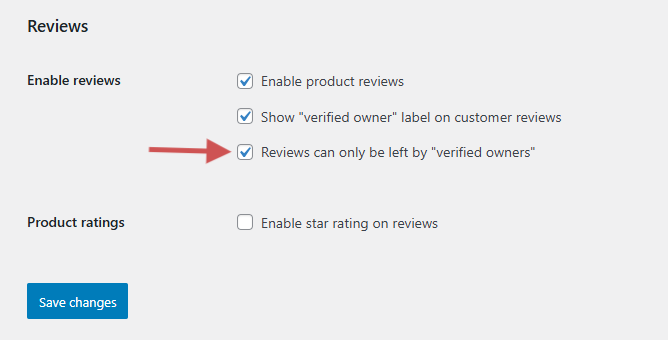
Step 5: Enable “verified owner” only reviews (Recommended)
Go to WooCommerce → Settings → Products → Reviews and enable:
Reviews can only be left by verified owners. This stops accounts without purchases from posting.
All your reviews in one place
Collect reviews, manage every response, and display them where they matter most.
Here are the steps to import and export WooCommerce reviews in a clean and organized way.
How to Export WooCommerce Reviews
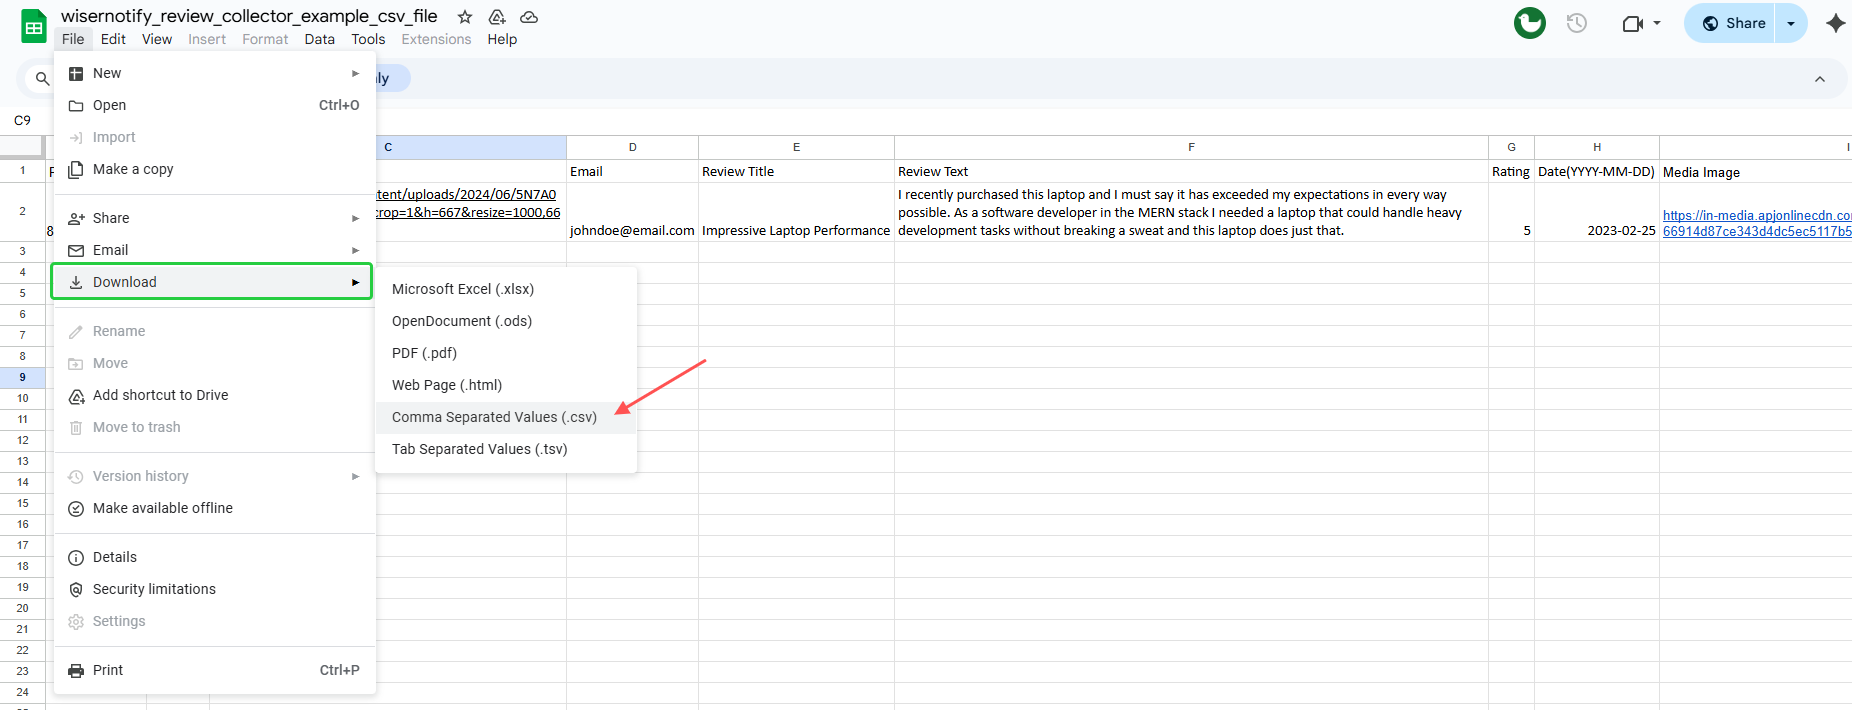
The Import Export Suite for WooCommerce lets you export all product reviews in a clean CSV or XML file.
It gives you simple options for quick exports and advanced controls for filters, custom fields, and saved templates. This helps you move reviews between sites, create backups, or analyze feedback with ease.
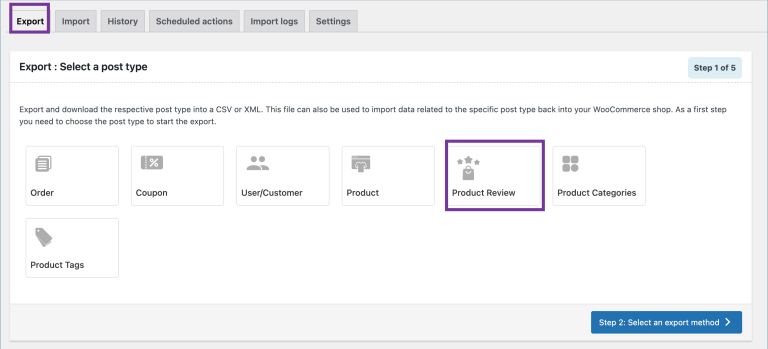
1. Start the Export
Go to WooCommerce → Import Export Suite → Export.
Choose Product Review as the post type.
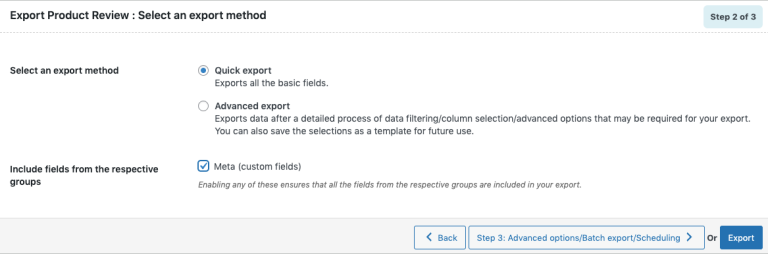
2. Pick an Export Method
You can choose one of these:
Quick Export: Exports basic fields. Select Meta groups if needed.
Pre-saved Template: Uses a template you saved earlier.
Advanced Export: Gives complete control over filters and columns.
Before you import reviews into WooCommerce, you need the review file from Etsy. Etsy allows sellers to download all reviews as a CSV file through the Shop Manager.
How Etsy sellers export their reviews
Etsy gives you a built-in option to download your reviews. The process is simple:
Log in to your Etsy account
Open Shop Manager
Go to Settings
Click Download Data
Select Reviews from the export options.
Click Download CSV
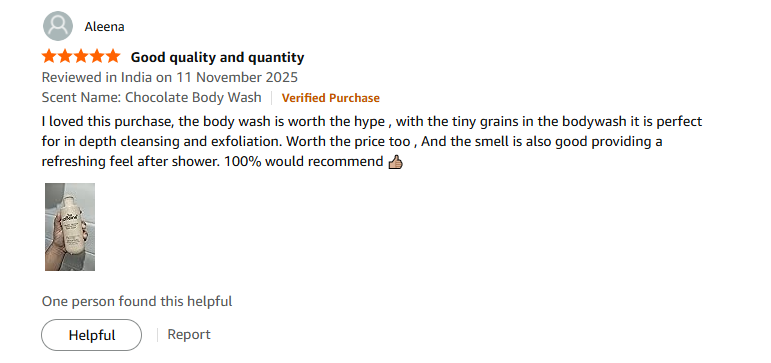
This file contains the rating, review text, buyer name, date, and any media details. It does not include WooCommerce product IDs, so you will add them while preparing the file.
You already have the Etsy CSV file exported. Now you only need to prepare it and import it into WooCommerce using WiserReview.
Step 1: Prepare your CSV file
Open your CSV file and follow these steps. And if you’re creating the file manually, make sure your CSV includes the following columns:
review_text – The actual review content.
Rating – Star rating (1 to 5).
reviewer_name – Name of the reviewer.
image_url – If the review includes a photo.
product_id – This must match the WooCommerce Product ID in your store.
Make sure each row clearly connects to the correct product by using the exact product ID from your WooCommerce catalog.
How to Find WooCommerce Product ID
To find the product ID for each item in your WooCommerce store:
Go to your WordPress admin dashboard
Click on Products in the left menu.
You’ll see a list of all your products.
In the product list, look at the “ID” column next to the product title.
Note down or copy that number. This is your Product ID.
If you don’t see the ID column:
Click on Screen Options (top right corner of the Products page)
Check the box labeled ID.
Click Apply now, and the ID column will be visible.
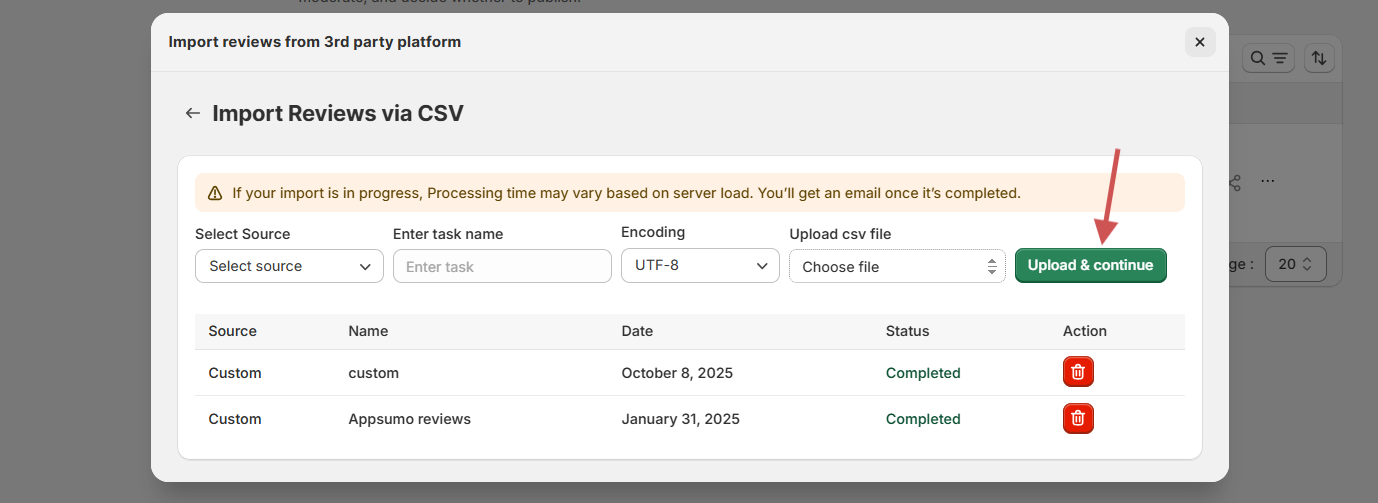
Step 2: Upload the CSV into WiserReview
Once your CSV is ready:
1. Open your WiserReview dashboard
2. Go to the Manage Reviews section.
3. Click Import via CSV
4. Upload your file
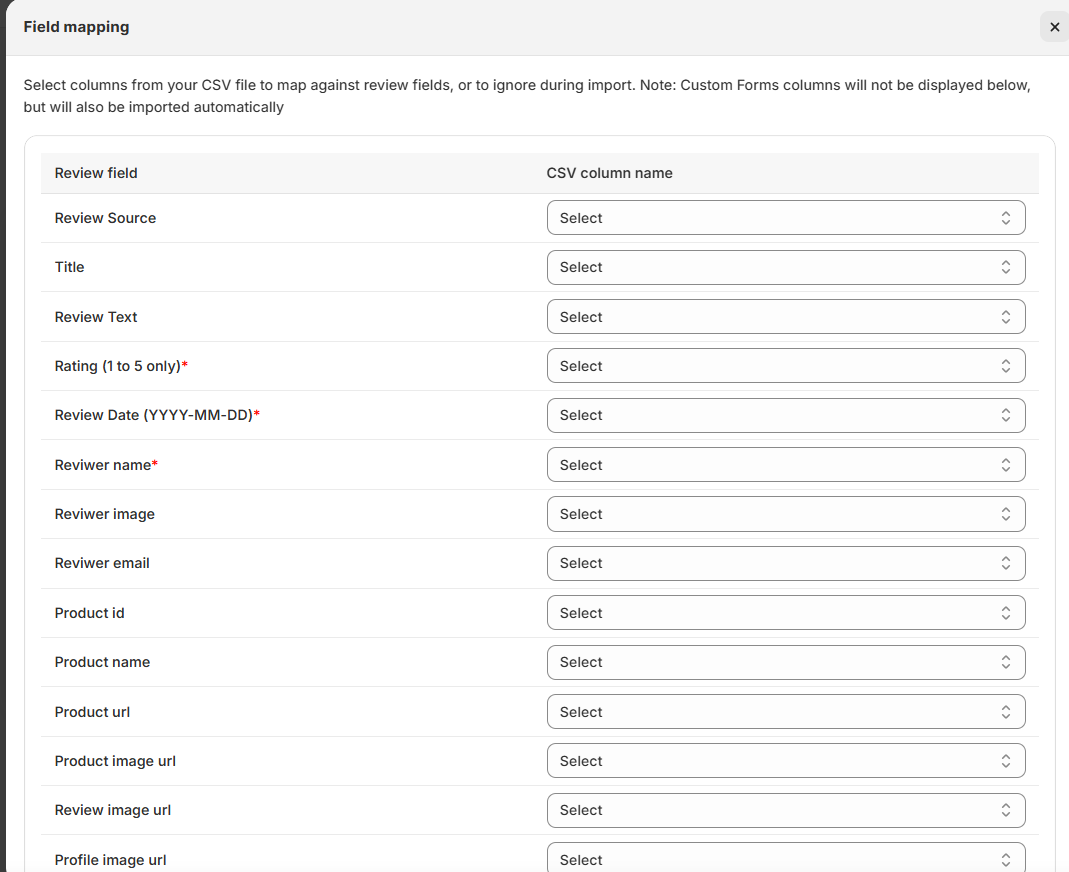
During field mapping, match each column in your CSV with the correct WiserReview fields:
Review Text → review_text
Rating → rating
Reviewer Name → reviewer_name
Image → image_url
Product → product_id
5. Complete the import
6. Go to each product in WiserReview to confirm the reviews are linked correctly.
WiserReview will process the file, match reviews with products, and insert them into your review system.
All your reviews in one place
Collect reviews, manage every response, and display them where they matter most.
Once your Etsy reviews are imported through CSV, the next step is to show them on your store in a way that builds trust and supports sales.
This is where the WiserReview plugin becomes a powerful tool for WooCommerce users.
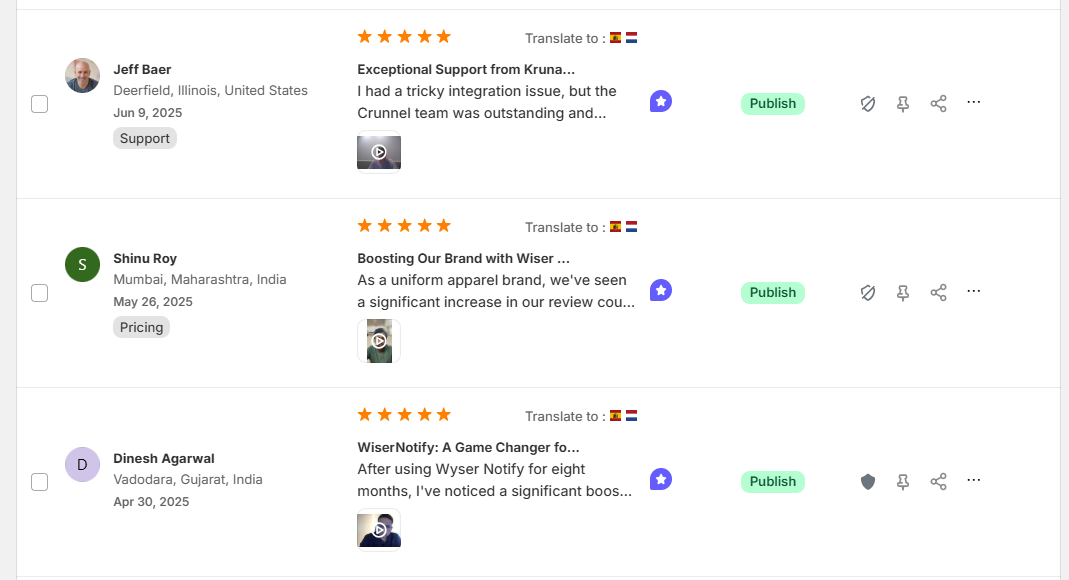
WiserReview doesn’t just store your reviews; it gives you a complete set of tools to moderate, style, organize, and publish them anywhere on your site using widgets.
WiserReview offers customizable widgets to display imported reviews on product pages, landing pages, or pop-ups.
Floating Popup – A small box that pops up on the side of the screen
Trust Badge – A compact star rating badge
Review Wall – A full-page layout showing multiple reviews
3. Customize font, layout, colors, and what type of reviews show (e.g., with images, by tag)
4. Embed using shortcode or auto-install if you’re on Shopify/WooCommerce.
5. Preview and save.
You can also display reviews through the WiserReview plugin settings.
If you do not want to place widgets manually, WiserReview can show your imported reviews automatically using its built-in options.
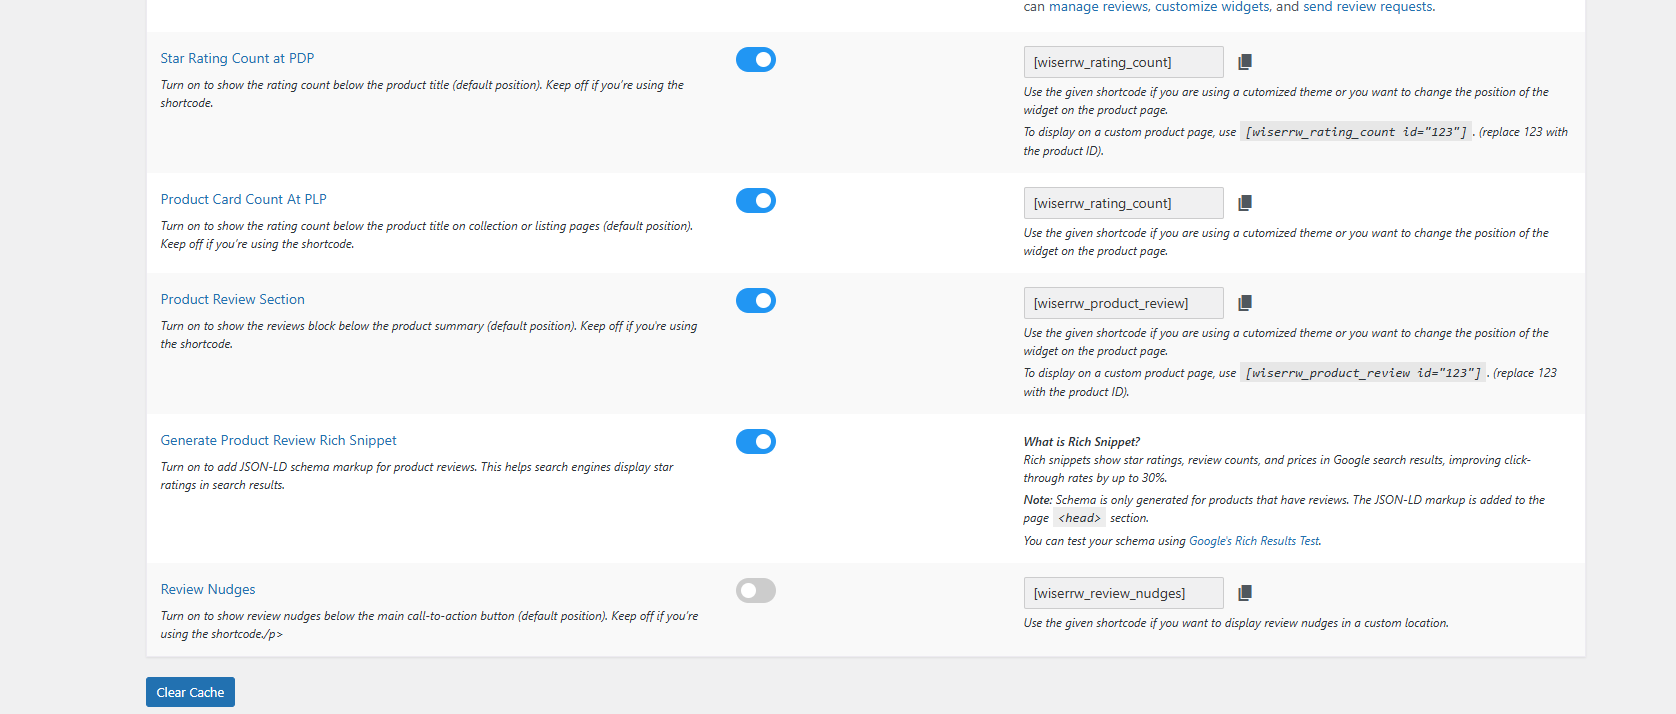
These settings control the star rating, review section, rich snippets, and more. You only need to turn them on once, and the plugin will handle the placement on your product pages.
Here’s what you can enable:
Star Rating Count at Product Page – Shows the total rating below the product title.
Product Card Rating Count at Listing Pages – Shows rating on category or collection pages.
Product Review Section – Displays the whole review block under the product summary.
Review Nudges – Adds small review highlights near the add-to-cart button.
Rich Snippet Markup – Adds schema data so Google can show star ratings in search results.
All these options work with your imported Etsy reviews. Once you switch them on, the reviews will appear in the right places without adding any shortcode.
These settings save time, especially if you have many products or use a theme that follows WooCommerce’s default layout.
Step 4: Check the output
Visit a few product pages to make sure the reviews display correctly.
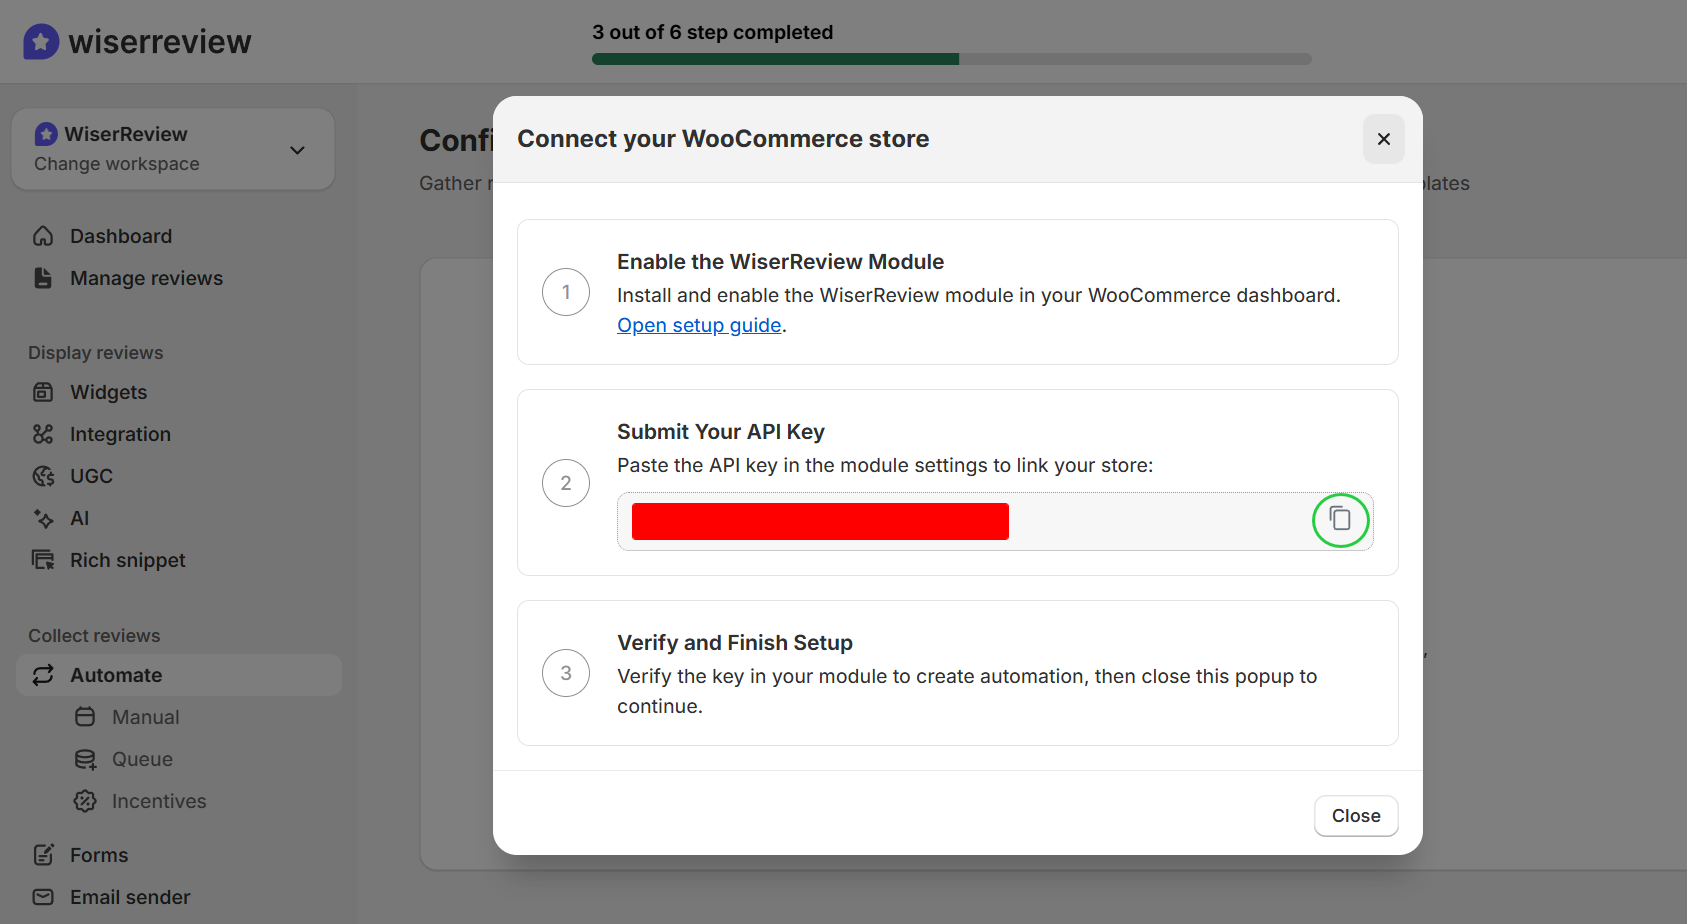
Submit Your API Key: Copy the “API key’ shown in the pop-up and paste it into the API Key field inside the WiserReview module settings in WooCommerce.
Verify and Finish Setup: After saving the key in your WooCommerce backend, return to WiserReview. Close the pop-up and continue to the next step.
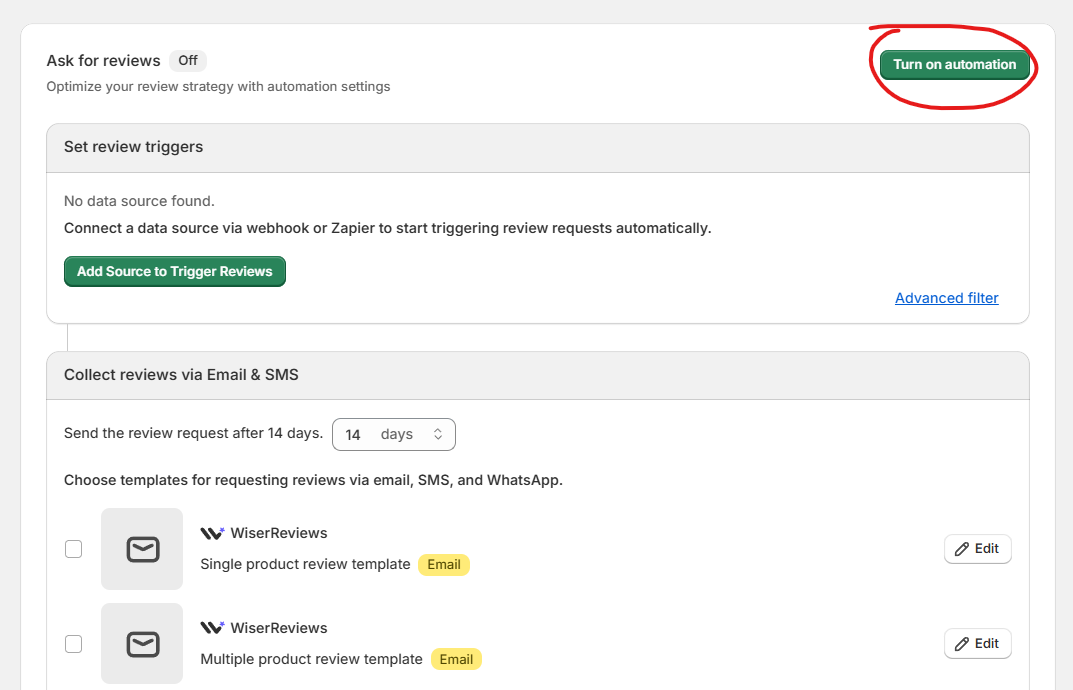
Step 3: Set up when to send review emails
When you change the order status to “completed” in your WooCommerce store, the order data is automatically pushed to the WiserReview automation campaign for collecting reviews.
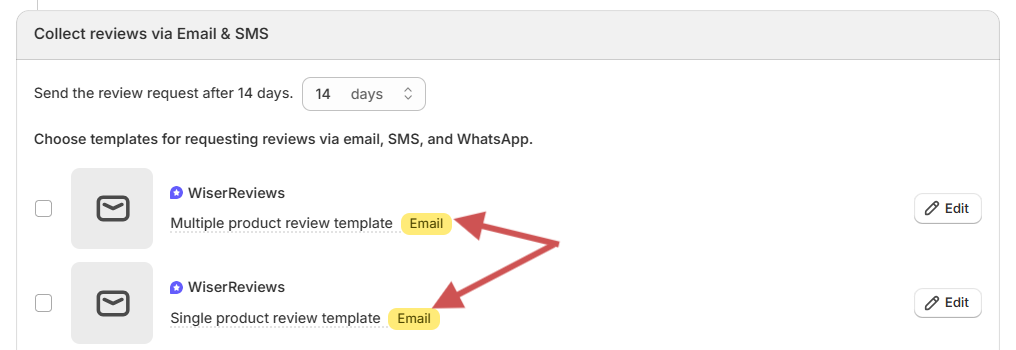
Choose how many days after the order is placed to send the review emails.
Example: Send after 7 days to give time for delivery.
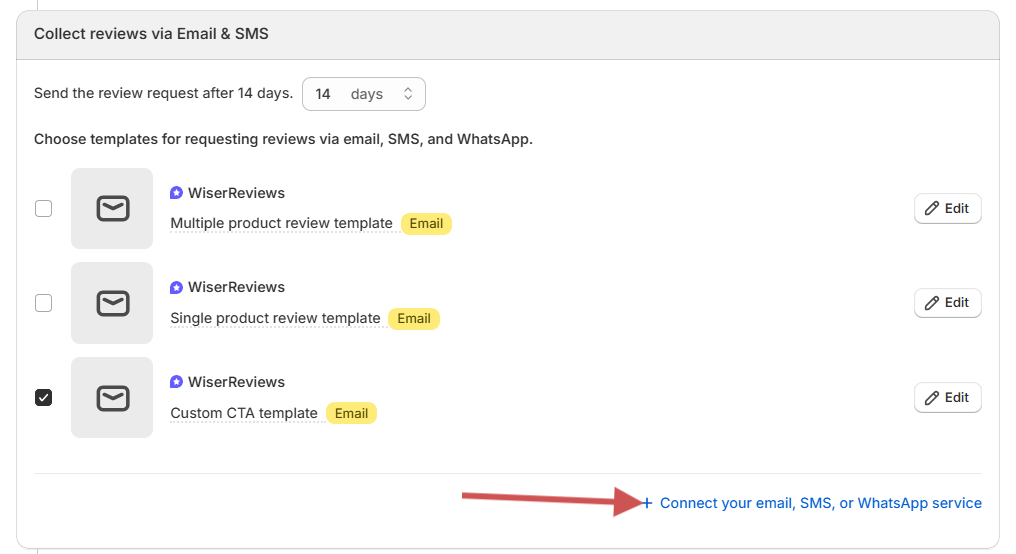
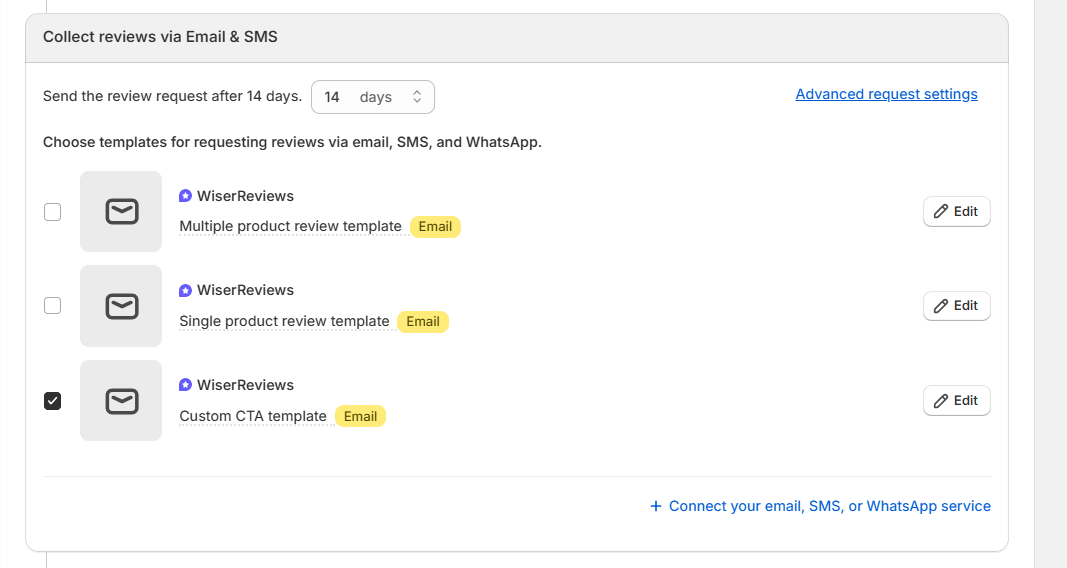
Step 4: Collect Review Via Email or SMS
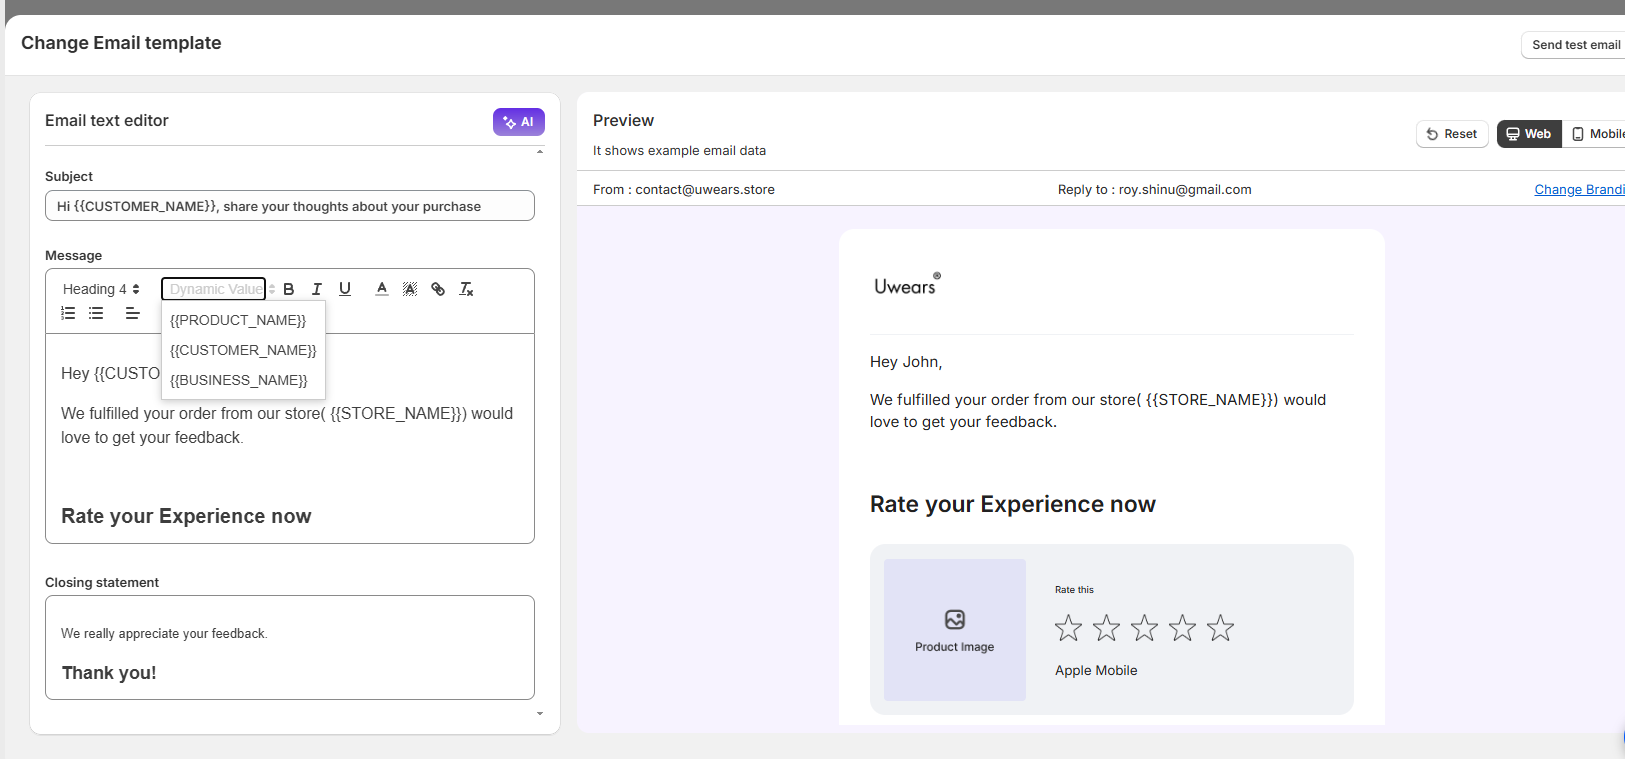
Select one of the available Email templates:
Single product review
Multiple product reviews
Click Edit to: Update content, Add branding. Use dynamic tags like {customer_name}, {product_name}, {review_link}
Click Send Test Email inside the editor to preview the message.
Enable Additional Channels (Optional)
Connect your WhatsApp & SMS channels or tools to send review requests, and add a message template for WhatsApp or SMS in your marketing channel.
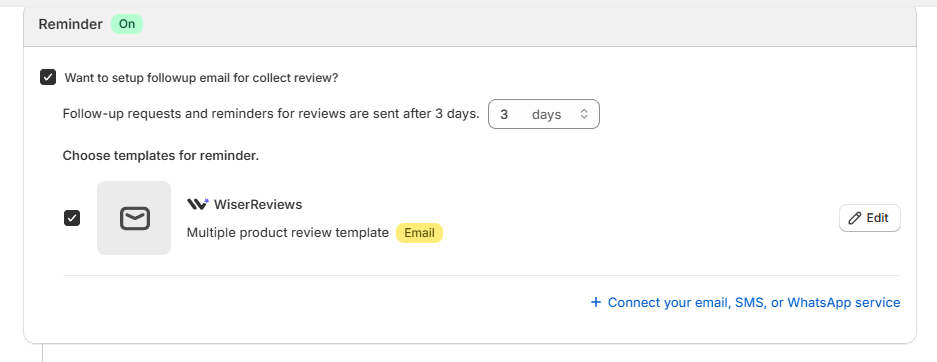
Step 5: Enable Reminder Emails (optional)
Turn on the Reminder toggle. Set how many days later the reminder should be sent (e.g., 3 days after the first email)
Select your reminder template and click ‘Edit’ to customize it. Test the reminder email using the Send Test Email button.
Step 6: Final Testing and Activation
Ensure you’ve tested the following: the first review request email, the Reminder email (if used), and the Media follow-up email (if used).
After testing, click Save. Ensure the automation is set to ON.
Plugins are the fastest way to add schema markup without touching code. Here’s how you can set up rich snippets via a plugin.
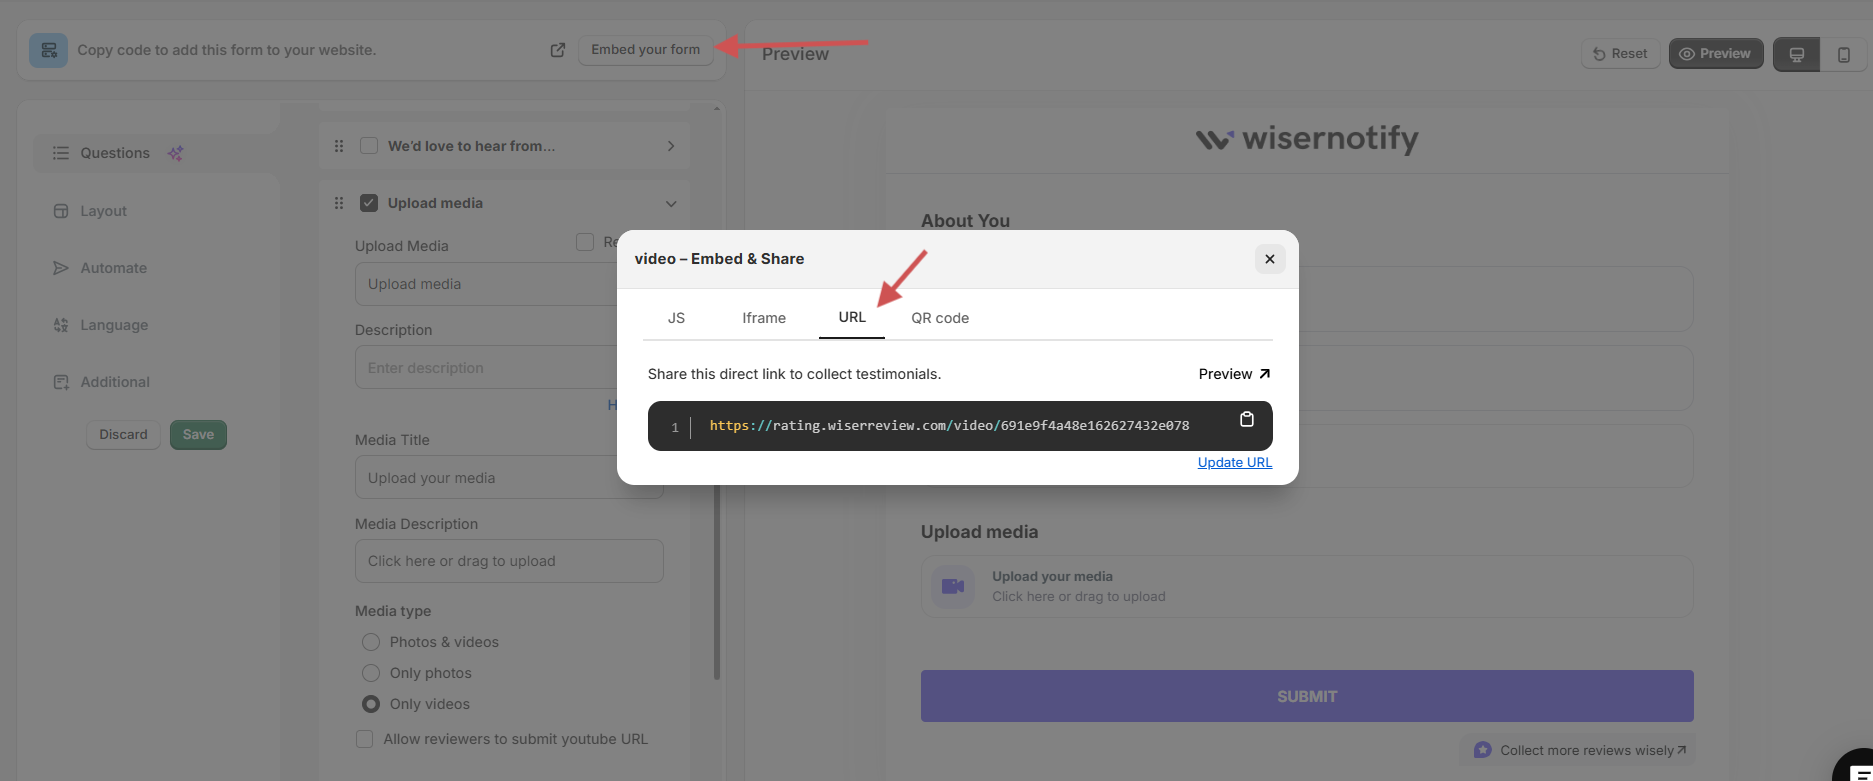
The steps below outline the entire flow from collecting videos to displaying them on product pages.
Step 1: Install the WiserReview WooCommerce plugin
Log in to your WordPress dashboard.
Go to Plugins → Add New.
Search for “WiserReview”.
Click Install, then Activate.
Once installed, open the plugin panel from the left menu.
Step 2: Connect your WiserReview account
Inside the plugin screen:
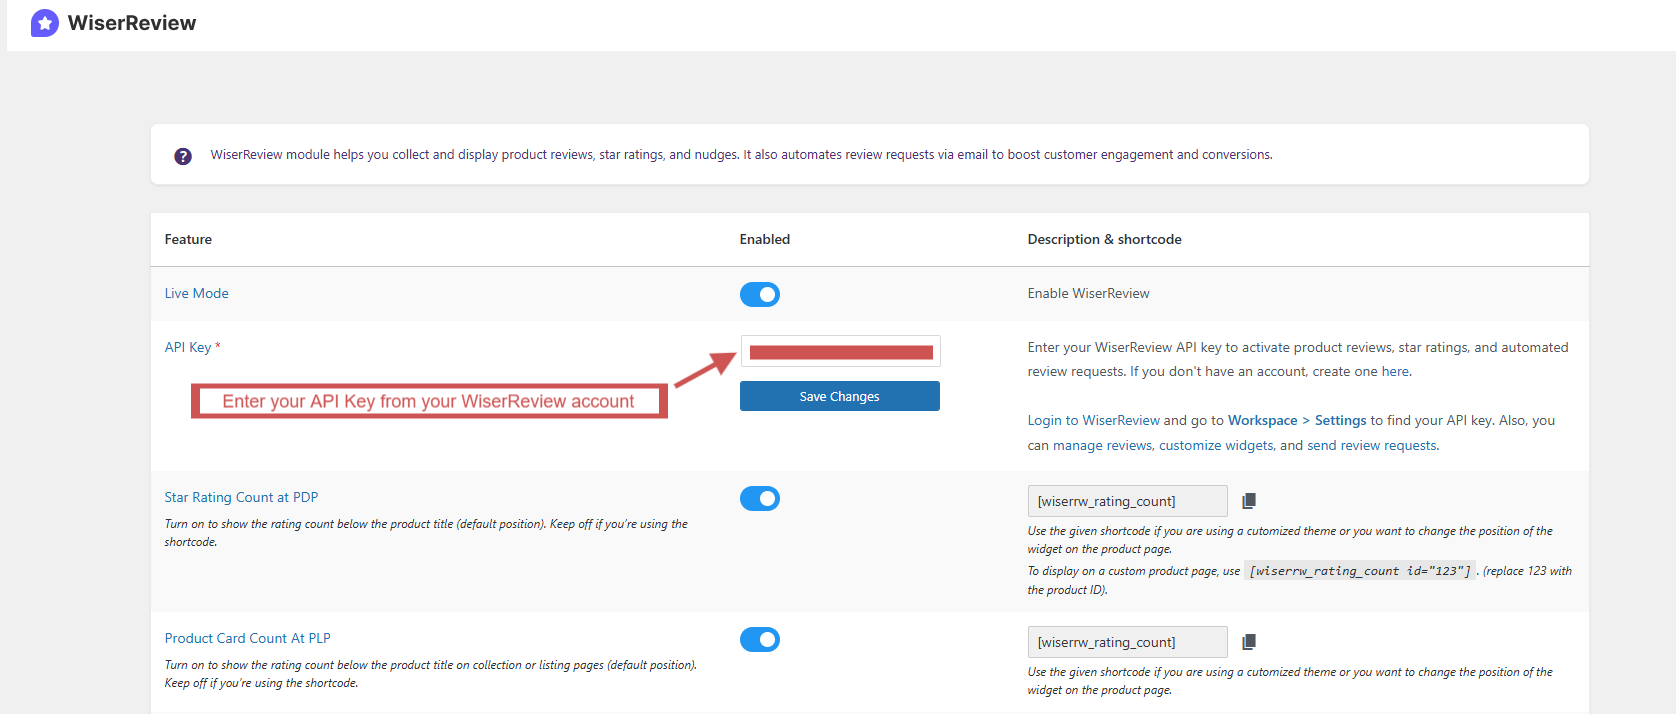
Go to WiserReview → Settings.
Enter your API Key from your WiserReview account.
First, Log in for WiserReview.
You can find it under setting→ •API key in your WiserReview dashboard.
Save the settings.
Your products will sync automatically, and all reviews will be mapped to the correct WooCommerce products.
Step 3: Turn on rich snippets toggle
Turn on the “Generate Product Review Rich Snippet” toggle in the WiserReview plugin settings, and the plugin will automatically add JSON-LD review schema to your WooCommerce product pages so Google can show star ratings in search results.
Once enabled:
WiserReview adds JSON-LD schema in your product page <head> section
Schema includes:
Star rating
Review count
Review text
Product info
SKU and identifiers (if available)
You do NOT need to add any code manually.
Step 4: Make sure your products have reviews
Rich Snippets only work if the product has at least one approved review.
You now know how WooCommerce reviews work and how to set them up, manage them, and fix the common issues.
Reviews help customers trust your products and improve conversions.
If you want richer features like photo and video reviews, automated emails, and better widgets, WiserReview gives you a faster and more complete setup.
This helps you collect more reviews and show stronger social proof on your store.
All your reviews in one place
Collect reviews, manage every response, and display them where they matter most.
Go to WooCommerce → Settings → Products and turn on the product review option. This adds the review box to your product pages.
Reviews won’t show if global reviews are disabled, the product’s review option is off, your theme hides the review tab, or a plugin conflict blocks it.
Use automated review request emails, send reminders, and allow photo or video reviews. Tools like WiserReview make this process easy.
Not by default. WooCommerce supports only text reviews. You need a plugin like WiserReview to enable photo and video uploads.
Use a reviews plugin that provides shortcodes. With WiserReview, you copy the shortcode from the widget and paste it into any page or block.
Article by
Krunal
Krunal Vaghasia is the founder of WiserReview and an eCommerce expert in review management and social proof. He helps brands build trust through fair, flexible, and customer-driven review systems. Read more.


 4. Embed using shortcode or auto-install if you’re on Shopify/WooCommerce.